Creating Numbered or Bulleted Lists
From Apache OpenOffice Wiki
- What Is Writer?
- The Writer interface
- Changing Document Views
- Moving Quickly through a Document
- Working with documents
- Working with text
- Selecting Items That Are Not Consecutive
- Selecting a Vertical Block of Text
- Cutting, Copying, and Pasting Text
- Finding and Replacing Text and Formatting
- Inserting Special Characters
- Inserting Dashes and Non-breaking Spaces and Hyphens
- Setting Tab Stops and Indents
- Changing the Default Tab stop Interval
- Checking Spelling and Grammar
- Using Built-in Language tools
- Using AutoCorrect
- Using Word Completion
- Using AutoText
- Formatting Text
- Formatting Paragraphs
- Formatting Characters
- Auto-formatting
- Creating Numbered or Bulleted Lists
- Hyphenating Words
- Formatting Pages
- Adding Comments and Graphics to a Document
- Creating a Table of Contents
- Creating Indexes and Bibliographies
- Adding Images and Other Graphics
- Adding Tables, Spreadsheets, and Charts
- Adding a Movie or Sound
- Printing
- Using Mail Merge
- Tracking Changes to a Document
- Using Fields
- Linking to another part of a document
- Using Master Documents
- Creating Fill-in Forms
Creating Numbered or Bulleted Lists
There are several ways to create numbered or bulleted lists:
- Use auto-formatting, as described above.
- Use list (numbering) styles, as described in Chapters 6 (Introduction to Styles) and 7 (Working with Styles) in the Writer Guide.
- Use the Numbering and Bullets icons on the paragraph formatting toolbar (see Figure 50): select the paragraphs in the list, and then click the appropriate icon on the toolbar.
| It is a matter of personal preference whether you type your information first, then apply Numbering/Bullets, or apply them as you type. |
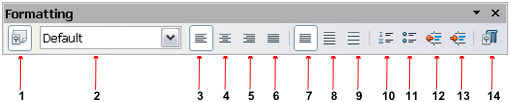
Using the Bullets and Numbering Toolbar
You can create nested lists (where one or more list items has a sub-list under it, as in an outline, by using the buttons on the Bullets and Numbering toolbar (Figure 52). You can move items up or down the list, or create sub-points, and even change the style of bullets. Use View → Toolbars → Bullets and Numbering to see the toolbar.
The appearance of the icons may vary with your operating system and the selection of icon size and style in Tools → Options → OpenOffice → View.

| 1 | Bullets On/Off | 6 | Promote One Level with Sub-points |
10 | Move Down |
| 2 | Numbering On/Off | 11 | Move Up with Subpoints | ||
| 3 | Numbering Off | 7 | Demote One Level with Sub-points | 12 | Open Character Format Dialog |
| 4 | Promote One Level | 8 | Insert Unnumbered Entry | 13 | Restart Numbering |
| 5 | Demote One Level | 9 | Move Up | 14 | Bullets and Numbering |
| If numbering or bullets are being applied automatically in a way that you find inappropriate, you can switch them off temporarily by unchecking Format → AutoCorrect → While Typing. |
| Content on this page is licensed under the Creative Common Attribution 3.0 license (CC-BY). |