Using Cross-References
From Apache OpenOffice Wiki
< Documentation | AOO4 User Guides/Getting Started | Getting Started with Writer | Xrefs and Bookmarks
- What Is Writer?
- The Writer interface
- Changing Document Views
- Moving Quickly through a Document
- Working with documents
- Working with text
- Selecting Items That Are Not Consecutive
- Selecting a Vertical Block of Text
- Cutting, Copying, and Pasting Text
- Finding and Replacing Text and Formatting
- Inserting Special Characters
- Inserting Dashes and Non-breaking Spaces and Hyphens
- Setting Tab Stops and Indents
- Changing the Default Tab stop Interval
- Checking Spelling and Grammar
- Using Built-in Language tools
- Using AutoCorrect
- Using Word Completion
- Using AutoText
- Formatting Text
- Formatting Pages
- Adding Comments and Graphics to a Document
- Creating a Table of Contents
- Creating Indexes and Bibliographies
- Adding Images and Other Graphics
- Adding Tables, Spreadsheets, and Charts
- Adding a Movie or Sound
- Printing
- Using Mail Merge
- Tracking Changes to a Document
- Using Fields
- Linking to another part of a document
- Using Hyperlinks
- Using Cross-References
- Using Bookmarks
- Using Master Documents
- Creating Fill-in Forms
Using Cross-References
If you type in references to other parts of the document, those references can easily get out of date if you reword a heading, add or remove figures, or reorganize topics. Replace any typed cross-references with automatic ones and, when you update fields, all the references will update automatically to show the current wording or page numbers. The Cross-references tab of the Fields dialog lists some items, such as headings, bookmarks, figures, tables, and numbered items such as steps in a procedure. You can also create your own reference items; see “Setting References” in Chapter 14 (Working with Fields) in the Writer Guide for instructions.
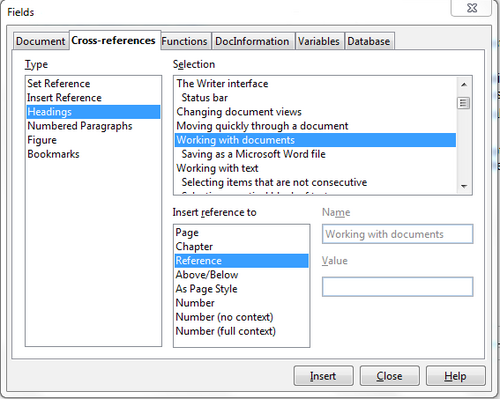
To insert a cross-reference to a heading, figure, bookmark, or other item:
- In your document, place the cursor where you want the cross-reference to appear.
- If the Fields dialog is not open, click Insert → Cross-reference. On the Cross-references tab, in the Type list, select the type of item to be referenced (for example, Heading or Figure). You can leave this page open while you insert many cross-references.
- Click on the required item in the Selection list, which shows all the items of the selected type. In the Format list, choose the format required. Usually this will be Reference (to insert the full text of the heading or caption), Category and Number (to insert the word “Figure” or “Table” and its number, but without the caption text), Numbering (to insert only the figure or table number, without the word “Figure” or “Table”), or Page (to insert the number of the page the referenced text is on). Click Insert .
| Content on this page is licensed under the Creative Common Attribution 3.0 license (CC-BY). |
