Defining a hierarchy of headings
- Applying styles
- Modifying styles
- Creating new (custom) styles
- Copying and moving styles
- Deleting styles
- Working with paragraph styles
- Outline numbering
- Defining a hierarchy of headings
- Working with list (numbering) styles
- Working with conditional paragraph styles
- Working with frame styles
- Working with page styles
Paragraph styles and headings hierarchy
Tools > Outline Numbering defines the hierarchy of headings in a document. Headings can be numbered or not; typically the first-level headings in a book-length document are chapter titles, which may be numbered, but lower-level headings are not numbered. Some heading styles (such as those commonly used in engineering documents) number each heading level, for example 1, 1.1, 1.2, 2, 2.1, and so on. When chapters or sections are added or deleted, the numbering is automatically changed.
Paragraph styles are the key to OOo’s outline numbering feature. The default paragraph styles assigned to outline levels are the heading styles supplied with OOo: Heading 1, Heading 2, and so on. However, you can substitute any styles you wish, including custom (user-defined) styles.
The headings defined using the outline numbering feature can be used for more than the table of contents (described in Chapter 12). For example, fields are commonly used to display headings in headers and footers of pages (see [insert reference]), and Writer can send the outline to Impress to use as the basis for a presentation (see the Impress Guide for details).
Choosing paragraph styles for outline levels
If you are using the default heading styles for the headings in your outline, and you are not using heading numbering, you do not need to do anything on the Outline Numbering dialog box. The default outline numbering scheme uses the default heading styles (Heading 1, Heading 2, and so on).
To use custom styles in place of the default heading styles:
- Click Tools > Outline Numbering to open the Outline Numbering dialog box.
- Click the number in the Level box corresponding to the heading for which you want to change the paragraph style.
- In the Numbering section, choose from the drop-down list of paragraph styles the style you want to assign to that heading level. For example, when setting up a chapter in the Writer Guide, you would click Level 1 and choose OOoHeading1 (a custom style defined for the OOoAuthors project) to replace Heading 1 and for Level 2, OOoHeading2 to replace Heading 2.
- Repeat for each outline level that you want to change. Click OK when done.
-
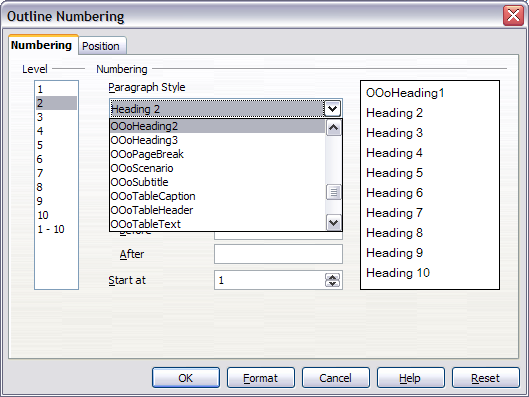
Choosing paragraph styles for outline levels.

Setting up heading numbering
If you want one or more heading levels to be numbered, many choices are available; this example defines a scheme to create headings that look like those in the example.

The numbering scheme to be set up.
Use the Numbering page of the Outline Numbering dialog to define the numbering scheme and its appearance. The figure below shows the default settings in the Outline Numbering dialog.

Default settings on the Outline Numbering dialog.
- In the Level list, choose 1. In the Number list, choose 1, 2, 3, ... The result is shown in the preview box on the right (see below).
- In the Level list, choose 2. In the Number list, choose 1, 2, 3, ... The Show sublevels list is now active; it should show 2 (if not, choose 2). The result is shown below.
- In the Level list, choose 3. In the Number list, choose 1, 2, 3, ... The Show sublevels list should show 3 (if not, choose 3). The result is shown below.

Specifying numbering of Level 1 headings.

Specifying numbering of Level 2 headings.

Specifying numbering of Level 3 headings.
These choices produce the layout shown below.

Results of numbering choices for headings.
Setting up the indentation of headings
Whether or not the headings are numbered, you may want to change some of their formatting. For example, you may want the second and third level headings to be indented from the margin. For numbered headings, you may also want the second line of long headings to line up with the first word of the heading, not the number. For these changes, use the Position page of the Outline Numbering dialog. The figure below shows the default version of this page.

Default settings on Position page of Outline Numbering dialog.
- In the Level list, choose 2. Change the value for Indent as shown below. You may want to use a different value.
- To change the wrapping behavior of long headings, change the value of Space to text, as shown below.
- In the Level list, choose 3. Change the value for Indent as shown below. You may also wish to change the Space to text value. The final result is shown in Setting up heading numbering.

Indenting Level 2 headings.
Notice how the preview area at the bottom of the dialog has changed. This change indents the entire heading but does not affect the way long headings wrap around; see below.
[[Image:WG7-33a.png|thumb|Figure 33: Result of changes to indentation of Level 2 headings.

Changing the Space to text value to wrap long headings.
The result is shown below.

Result of changing Space to text value.

Indenting Level 3 headings.
Including chapter or section names in page headers
In addition to page numbers, headers and footers often include the name of the chapter or section. Because these names change from one chapter or section to the next, you need to use a field that displays information relevant to each page.
- Click Insert > Fields > Other to open the Fields dialog box.
- On the Document page, select Chapter in the Type list. The Format list now shows four choices.

Including the chapter name in page header.
The Layer box determines which outline level is displayed in the field. For example, Layer 1 always displays the most recently found heading that has the paragraph style selected for Level 1 in the Outline Numbering dialog box, Layer 2 displays the most recent heading with the paragraph style selected for Level 2 in outline numbering, and so on.
| A Chapter field in a page header always picks up the highest heading level on a page, even if you have specified a lower level in the Layer box. For example, if a page has a Heading 1 and a Heading 2 on it, then a Layer 2 Chapter name field in the header of that page will display the Heading 1 paragraph, not the first Heading 2 paragraph, as intended. In a footer, the layers work as intended. |
| Content on this page is licensed under the Creative Common Attribution 3.0 license (CC-BY). |