Working with frame styles
- Applying styles
- Modifying styles
- Creating new (custom) styles
- Copying and moving styles
- Deleting styles
- Working with paragraph styles
- Outline numbering
- Defining a hierarchy of headings
- Working with list (numbering) styles
- Working with conditional paragraph styles
- Working with frame styles
- Working with page styles
Introducing frame styles
Frames are often used as containers for text or graphics. To provide consistency in the appearance of frames used for similar purposes, it is a good idea to define styles for frames. For example, you might want photographs to be enclosed in a frame with a drop-shadowed border, line drawings in a frame with a plain border, marginal notes in a frame without a border but with a shaded background, and so on.
Writer provides several predefined frame styles, which you can modify as needed; and you can define other frame styles. The technique for defining and applying frame styles is similar to that for other styles.
| There is considerable overlap between the uses of frames and of sections for some page layout purposes. You may find it useful to take a look at Chapter 4 (Formatting Pages) for information about the use of frames and sections. |
How frame styles work
When an object is added to Writer, it is automatically enclosed in a frame of a predetermined type. The frame sets how the object is placed on the page, as well as how it interacts with other elements in the document. You can edit the frame by modifying the frame style it uses or by using a manual override when a frame is added to the document.
Because frames and objects are used together, it sometimes is easy to forget they are separate elements. In some cases, such as charts, you can edit the frame and object separately, so the distinction is worth remembering.
Unlike other elements that use styles, frames can be defined only partly by their style because their use can vary so much. Several elements of frames, such as the anchor and protected elements, need to be defined manually for individual frames.
You can format a frame manually when you select Insert > Frame. The dialog box that opens contains all the settings available when frame styles are set up, as well as some only available when the frame is inserted. As with other styles, the most efficient way to format frames is in the Styles and Formatting window.
Planning the styles
If you are using a mix of graphics, you may want to define two related styles, one with a border line for graphics with white backgrounds and one without a border for all other backgrounds. You also may want to design one or more frames for text only.
Otherwise, the default frame styles (listed in Table 1) cover most users' needs. The only significant addition that many users might need is one or more styles for text frames.
Table 1. Various frame styles and their uses
| Style | Comments and Use |
| Formula | The frame style used for formulas. The default includes AutoSize, which adjusts the size of the frame to the formula. |
| Frame | The default frame style. |
| Graphics | The default style for graphics. The defaults include autosizing to fit the graphic, no text wrap, and a thin border around the frame. These are reasonable defaults, except for the border. Unless the background of the graphic is white and the document's background also is white, the border usually is unnecessary. |
| Labels | The default style for use with File > New > Labels. It seems to be used by OpenOffice.org automatically and is not intended for users at all. |
| Marginalia | A style for placing a frame beside the left margin. As the name suggests, the Marginalia style is intended for comments added in the margin of text. The style also is useful for creating sideheads—headings against the left margin, which often are used in technical documentation. To set up sideheads, create body text styles with two inches or more indentation from the left. Then, place the cursor at the start of a body text paragraph, add the frame, and apply the Marginalia style. |
| OLE | The default style for OLE objects and floating frames. The default places the frame at the top and center of a body of text. |
| Watermark | The default style for a watermark, a graphic placed as the background to a body of text. The default is a Through wrap, with text passing over the frame and anything in it. The graphic should be faint enough that text still is readable over top of it. |
Formatting frames
You can access frame settings by selecting New or Modify in the Styles and Formatting window for a frame style or by selecting Insert > Frame from the menu. Once a frame is added to a document, you can double-click the frame to open the Frame dialog box or modify the style in the Styles and Formatting window.
Frame settings are available from the following tabbed pages:
- Type page: sets the size and position of the frame. One of the most useful options here is AutoSize, which automatically adjusts the frame to the object it contains. If the frame style is one used automatically, then this option should be selected.
- Options page: sets whether the contents of the frame are printed and able to be edited in a read-only document. The tab also sets the text direction, which is useful if you are using the frame for contents in a language that uses right-to-left text direction.
- Wrap page: sets how text is positioned in relation to the frame and how close text comes to a frame. If you want the frame contents to stand out from the paragraphs around it, set the wrap to None. This probably is the single most important tab for frames.
- Background page: sets the background color or graphic. This tab is useful mostly for text frames in complex page layouts, in which a text frame has an appearance different from the general background of the page.
- Border page: sets the line around the frame, if any. Many beginning designers make the mistake of adding a border to every frame. However, when a colored background distinctly marks the division between the frame's contents and the rest of the page, borders are unnecessary.
- Columns page: sets the number of columns used in the frame. This tab can be ignored unless the frame is being used for text.
- Macro page: sets a macro to use with the frame. These options are useful only in an on-line Writer or HTML document.
Applying frame styles
Whenever you insert an object into a document, it will automatically have a frame around it. Some designers like to add frame styles to introduce variation. For example, you could have two different frame styles for graphics: one that is centered for small graphics and another that is left-aligned for graphics that take up the entire width of the main frame. In such a case, you will need to add at least one frame style.
To apply a style to a frame:
- Select the frame.
- Bring up the Styles and Formatting window (for example, by pressing F11).
- Click the Frame Styles icon (the third one from the left).
- Double-click the frame style you want.
| When a frame is selected, the Apply Style list at the left of the formatting toolbar displays frame styles. You can use this to change the style of a frame. |
Most of a frame's design can be set in the style. However, the following options must be set manually:
- Anchoring: how the frame is positioned in relation to the rest of the page's contents (Format > Anchor).
- Arrangement: the frame's position in a stack of objects (Format > Arrange).
- Adding a hyperlink: so that a click on the frame opens a Web page or another document in an HTML file (Insert > Hyperlink).
The right-click menu also has items for anchoring and arrangement, as well as for wrap and alignment.
-
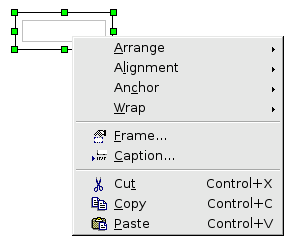
A frame’s right-click menu has positioning options.

| Content on this page is licensed under the Creative Common Attribution 3.0 license (CC-BY). |