Defining Relationships
The structure that we have defined for the database tables assumes some relationships that have not yet been made explicit. The following table shows each database table and its fields.
| Expense_Categories |
Expenses |
People |
Sales
|
| ExpType |
ID |
PeopleID |
SaleID
|
| |
AmountSpent |
FirstName |
PersonID
|
| |
DatePurchased |
LastName |
Date
|
| |
EmployeeID |
|
Amount
|
| |
ExpenseType
|
Both the Expenses table and the Sales table have fields to identify people: EmployeeID and PersonID. When data is being entered into these tables, the PeopleID values are imported from the People table. This is known as a Foreign Key. The advantage of this relationship is that the FirstName and LastName values associated with the ID appear in only one place, a single row in the People table. If a person's name should change for some reason, only one row in one table needs to be edited. In this very simple example, that is not a very daunting task but in a real situation where there might be tables for salary, medical benefits, vacation, leaves, emergency contacts and much more, updating every entry in all the tables would be prone to error and quickly result in very unreliable data.
A similar relationship exists between the Expenses_Categories and the Expenses table, though the purpose is different. In that case, the values of ExpType serve to control the values that can be entered as an ExpenseType in the Expenses table. This is another form of a Foreign Key.
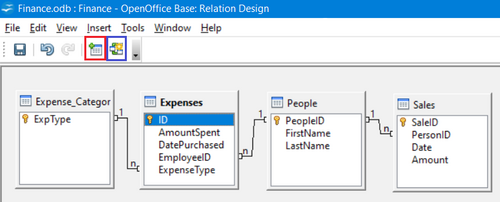
- To begin defining relationships in the database, choose Tools → Relationships. The Finance – OpenOffice Base: Relation Design window opens and the Add Tables dialog pops up. (You can also open it by clicking the Add Tables icon, highlighted in red in Figure 166, on the Relation Design window.)
- In this database, all the tables have a relationship to another table and must be added to the Relation Design Window. On the Add Tables dialog, use either of these ways to add a table to the Relation Design window:
- Double-click the name of the table.
- Or, click the name of the table and then click Add for each table.
- Click Close to close the Add Tables dialog when you have added the tables you want.< br/>
Figure 166 shows the Relation Design window in its final state after the relations have been created. At the current state of the process, you will not see the lines connecting the tables. The tables may also be closer together and not display all of their fields. Feel free to drag the tables farther apart and resize them by clicking on their edge and dragging.
You can define the relationship between pairs of tables in two ways:
- Click and drag the primary key field in one table to the foreign key field in the other table. When you release the mouse button, a connecting line forms between the two data fields. For example, drag from ExpType in Expense_Categories to ExpenseType in the Expenses table. Figure 166: Designation for a 1:n relationships
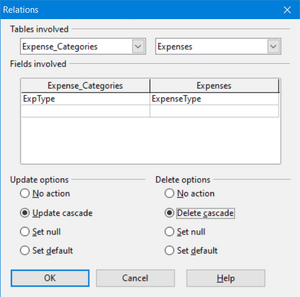
- Or, click the New Relation icon, highlighted in blue in Figure 166. This opens the Relations window (Figure 167). The available tables are listed in the drop-down lists in the Tables involved section.
- Select a table that holds the primary key from the left-hand drop-down list and the corresponding table holding the foreign key from the right-hand drop-down list. Figure 167 shows the tables Expense_Categories and Expenses selected.
- In the Fields involved section, click the drop-down list under the Expense_Categories label.
- Select ExpType from the list.
- Click in the cell to the right of this drop-down list. This opens a dropdown list for the Expenses table.
- Select ExpenseType from the Expenses table list. The dialog should now look like the top half of Figure 167.
- Under Update options select Update cascade and under Delete options select Delete cascade.
- Click OK.
Figure 167: Selected fields in a relationship
The Update cascade and Delete cascade options control what happens when one of the primary key options is updated (changed) or deleted. The cascade option means that any rows in the Expenses table using the modified or deleted value will likewise be modified or deleted. While these options are not strictly necessary, they do help. Having them selected permits you to update a table that has a relationship defined with another table. It also permits you to delete a field from the table.
You can now repeat the process of step 4 to make the relationships between the People table and the Expense and Sales tables. At this point the Relation Design window should look like Figure 166. After closing the Relation Design window, it is a good idea to save the Base document.
|

