Documentation/OOoAuthors User Manual/Writer Guide/Working with paragraph styles
- Applying styles
- Modifying styles
- Creating new (custom) styles
- Copying and moving styles
- Deleting styles
- Working with paragraph styles
- Outline numbering
- Defining a hierarchy of headings
- Working with list (numbering) styles
- Working with conditional paragraph styles
- Working with frame styles
- Working with page styles
| [[{{{PrevPage}}}|< Previous Page
]] |
[[{{{NextPage}}}|Next Page
>]] |
Working with paragraph styles
Chapter 6 (Introduction to Styles) covers the basics of using paragraph styles. This chapter looks at some advanced properties of paragraph styles and ways that you can use other features in OOo in conjunction with paragraph styles to do specific tasks like:
- Controlling page breaks
- Controlling tab stops
- Specifying a relative font size
- Selecting a language for a paragraph style
- Rotating the text in a paragraph style
- Kerning text (a feature that adjusts the letter spacing to make text more readable)
- Using styles in outlining
- Including chapter or section names in page headers
Controlling page breaks
Writer automatically flows text from one page to the next. If you do not like the default settings, you can change them on the Text Flow page of the Paragraph Style dialog box.
Automatic page or column breaks
The Options section of the Text Flow page of the Paragraph Style dialog box provides settings to control what happens when a paragraph does not fit on the bottom of a page.

Options for controlling automatic page or column breaks.
Do not split paragraph means that the paragraph is never split across two pages. If it does not fit on the bottom of one page, the entire paragraph moves to the top of the next.
Keep with next paragraph is appropriate for headings or the lead-in sentence to a list, to ensure that it is not the last paragraph on a page.
Orphan control and Widow control. Widows and orphans are typographic terms. An orphan is the first line of a paragraph printed alone at the bottom of a page or column. A widow is the last line of a paragraph which appears alone at the top of the next page or column. Use these options to allow paragraphs to split across pages or columns but require at least 2 or more lines to remain together at the bottom or top of a page or column. You can specify how many lines must remain together.
Required page or column breaks
You can require a paragraph to start on a new page or column and specify the style of the new page. A typical use is for chapter titles that you always want to start on a new page. This topic is covered in more detail in Chapter 4 (Formatting Pages).
On the Text Flow page of the Paragraph Style dialog box:
- In the Breaks section, select Insert. Make sure that Type is set to Page and Position to Before.
- Select With Page Style and choose the page style from the list.
- To continue page numbering from the previous chapter, leave Page number set at 0. To start each chapter's page numbering at 1, set Page number to 1.
- Click OK.
-

Setting a paragraph style to always start on a new page.

Controlling tab stops
Using tabs to space out material on a page is not recommended (depending on what you are trying to accomplish, a borderless table is usually a better choice), but if you do use tabs, do not use the default tabs set in Tools > Options > OpenOffice.org Writer > General (shown below); instead, define your own tab settings, as described in this section.

Selecting a default tab stop interval.
If you use the default tab interval and then send the document to someone else who has chosen a different default tab interval, tabbed material will change to use the other person's tab settings. This may cause a major formatting problem, as shown below.

Default tab settings might be different.
To avoid this problem, specify all the tab settings for the paragraph, using the Tabs page of the Paragraph Style dialog box.
Here you can choose the type of tab: left, right, centered, or decimal; the character to be used as a decimal point; and the fill character—the characters that appear between the end of the text before the tab and the beginning of the text after the tab. A common use of a fill character is the dots between a heading and a page number in a table of contents.

Specifying tab stops for a paragraph style.
Specifying a relative font size
If you are creating a style based on another style, you can specify a font size relative to that other style—either as a percentage or as a plus or minus point value (-2pt or +5pt). Relative font sizes are commonly used for Web pages.
For example, the paragraph style Heading 1 is based on the paragraph style Heading. The font size of the paragraph style Heading is 14pt, and the font size of paragraph style Heading 1 is specified as 115%. Thus the resultant font size of text in a paragraph formatted with paragraph style Heading 1 is 14pt x 115% = 16.1pt.
To specify a percentage font size, in the Paragraph Style dialog box, go to the Font tab. In the Size box, enter the percentage amount followed by the symbol % (see below). Similarly, you can enter a plus or minus sign followed by the number of points to be added or subtracted from the base font size.
To change from a relative font size back to an absolute font size, enter the desired font size in points followed by the letters “pt".

Selecting a type size based on a percentage.
It is also possible to use a Percentage Font size for character styles. See the note in Selecting a language for a paragraph style.
Selecting a language for a paragraph style
The language you select for a document (on Tools > Options > Language Settings > Languages) determines the dictionary used for spell checking, thesaurus and hyphenation, the decimal and thousands delimiter used, and the default currency format.
Within the document, you can apply a separate language to any paragraph style. This setting has priority over the language of the whole document. On the Font tab of the Paragraph Style dialog box, languages with installed dictionaries are marked in the Language list by a small ABC icon. When you check spelling, OOo will use the correct dictionary for paragraphs with this style.

Selecting a language for a paragraph style.
Note: You can assign a language to selected pieces of text in a paragraph using character styles, also on the Font page. This assignment has priority over the paragraph style and document language.
Rotating the text in a paragraph style
Two common uses for rotated paragraphs are to put portrait headers and footers on a landscape page and to fit headings above narrow table columns.

A table with rotated headings.
Chapter 4 (Formatting Pages) describes how to create portrait headers and footers on landscape pages by rotating characters. You can achieve the same effect by defining a separate header or footer paragraph style specifically for landscape pages.
As an example, we will apply rotated table headings to a preexisting table.
- Create a new paragraph style. Name it Table Heading Rotated.
- On the Position page of the Paragraph Style dialog box, in the Rotation / scaling section, select 90 degrees. Click OK to save the new style.
- Select the heading row of the table and apply the new style. Any text in the cells of the heading row is now rotated.
- If the headings are aligned to the top of the cells, you may want to change the alignment to the bottom of the cells. To do this, click the Bottom button on the Table toolbar.

Rotating a paragraph 90 degrees.

Aligning text to the bottom of cells.
Kerning text
Kerning means increasing or decreasing the amount of space between pairs of letters to improve the overall appearance of the text. Kerning automatically adjusts the character spacing for specific letter combinations. It is only available for certain font types and, for printed documents, only works if your printer supports it.

Kerning disabled (left) and enabled (right).
To turn kerning on, go to the Position page of the Paragraph Style dialog box. In the Spacing section, select the Pair kerning checkbox.
![]()
Turning on kerning of letters in a font.
Outline numbering
OpenOffice.org provides two ways to do outline numbering. Although both methods are called outline numbering, they serve two quite different purposes:
- Tools > Outline Numbering is for defining the hierarchy of headings. This method requires a separate paragraph style for each level of the hierarchy. The paragraph styles specified on the Outline Numbering dialog box determine which headings appear in the table of contents. Despite the name, headings do not have to be numbered. See Defining a hierarchy of headings.
- Numbering Styles are for defining the appearance of lists, both simple lists and outlines or nested lists—that is, numbered or bulleted paragraphs, some of which have numbered or bulletted sublists under them. This method requires only one paragraph style. These lists can be used for a variety of purposes. See Working with list (numbering) styles.
A document can use both methods. One document can have only one hierarchy of headings, but it can use several numbering styles (both simple and nested) for different purposes.
Defining a hierarchy of headings
Tools > Outline Numbering defines the hierarchy of headings in a document. Headings can be numbered or not; typically the first-level headings in a book-length document are chapter titles, which may be numbered, but lower-level headings are not numbered. Some heading styles (such as those commonly used in engineering documents) number each heading level, for example 1, 1.1, 1.2, 2, 2.1, and so on. When chapters or sections are added or deleted, the numbering is automatically changed.
Paragraph styles are the key to OOo’s outline numbering feature. The default paragraph styles assigned to outline levels are the heading styles supplied with OOo: Heading 1, Heading 2, and so on. However, you can substitute any styles you wish, including custom (user-defined) styles.
The headings defined using the outline numbering feature can be used for more than the table of contents (described in Chapter 12). For example, fields are commonly used to display headings in headers and footers of pages (see [insert reference]), and Writer can send the outline to Impress to use as the basis for a presentation (see the Impress Guide for details).
Choosing paragraph styles for outline levels
If you are using the default heading styles for the headings in your outline, and you are not using heading numbering, you do not need to do anything on the Outline Numbering dialog box. The default outline numbering scheme uses the default heading styles (Heading 1, Heading 2, and so on).
To use custom styles in place of the default heading styles:
- Click Tools > Outline Numbering to open the Outline Numbering dialog box.
- Click the number in the Level box corresponding to the heading for which you want to change the paragraph style.
- In the Numbering section, choose from the drop-down list of paragraph styles the style you want to assign to that heading level. For example, when setting up a chapter in the Writer Guide, you would click Level 1 and choose OOoHeading1 (a custom style defined for the OOoAuthors project) to replace Heading 1 and for Level 2, OOoHeading2 to replace Heading 2.
- Repeat for each outline level that you want to change. Click OK when done.
-
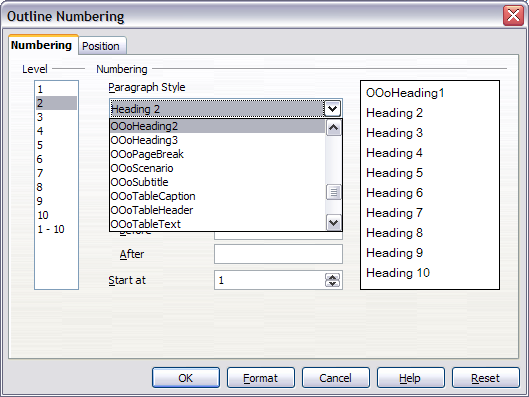
Choosing paragraph styles for outline levels.

Setting up heading numbering
If you want one or more heading levels to be numbered, many choices are available; this example defines a scheme to create headings that look like those in the example.

The numbering scheme to be set up.
Use the Numbering page of the Outline Numbering dialog to define the numbering scheme and its appearance. The figure below shows the default settings in the Outline Numbering dialog.

Default settings on the Outline Numbering dialog.
- In the Level list, choose 1. In the Number list, choose 1, 2, 3, ... The result is shown in the preview box on the right (see below).
- In the Level list, choose 2. In the Number list, choose 1, 2, 3, ... The Show sublevels list is now active; it should show 2 (if not, choose 2). The result is shown below.
- In the Level list, choose 3. In the Number list, choose 1, 2, 3, ... The Show sublevels list should show 3 (if not, choose 3). The result is shown below.

Specifying numbering of Level 1 headings.

Specifying numbering of Level 2 headings.

Specifying numbering of Level 3 headings.
These choices produce the layout shown below.

Results of numbering choices for headings.
Setting up the indentation of headings
Whether or not the headings are numbered, you may want to change some of their formatting. For example, you may want the second and third level headings to be indented from the margin. For numbered headings, you may also want the second line of long headings to line up with the first word of the heading, not the number. For these changes, use the Position page of the Outline Numbering dialog. The figure below shows the default version of this page.

Default settings on Position page of Outline Numbering dialog.]]
- In the Level list, choose 2. Change the value for Indent as shown below. You may want to use a different value.
- To change the wrapping behavior of long headings, change the value of Space to text, as shown below.
- In the Level list, choose 3. Change the value for Indent as shown below. You may also wish to change the Space to text value. The final result is shown in Setting up heading numbering.

Indenting Level 2 headings.
Notice how the preview area at the bottom of the dialog has changed. This change indents the entire heading but does not affect the way long headings wrap around; see below.
[[Image:WG7-33a.png|thumb|Figure 33: Result of changes to indentation of Level 2 headings.

Changing the Space to text value to wrap long headings.
The result is shown below.

Result of changing Space to text value.

Indenting Level 3 headings.
Including chapter or section names in page headers
In addition to page numbers, headers and footers often include the name of the chapter or section. Because these names change from one chapter or section to the next, you need to use a field that displays information relevant to each page.
- Click Insert > Fields > Other to open the Fields dialog box.
- On the Document page, select Chapter in the Type list. The Format list now shows four choices.

Including the chapter name in page header.
The Layer box determines which outline level is displayed in the field. For example, Layer 1 always displays the most recently found heading that has the paragraph style selected for Level 1 in the Outline Numbering dialog box, Layer 2 displays the most recent heading with the paragraph style selected for Level 2 in outline numbering, and so on.
| Content on this page is licensed under the Creative Common Attribution 3.0 license (CC-BY). |