Ajout d'images à un document
- Ajout d'images à un document
- Modification d'une image
- Rognage, redimensionnement, rotation et autres paramétrages
- Utilisation des outils de dessin Writer
- Positionnement des images dans le texte
- Disposition, ancrage et alignement
- Adaptation du texte autour des images
- Exemple d'adaptation du texte
- Ajout de légendes aux images
- Ajout d'une image à la Gallery
- Types de fichier d'image supportés
Les images peuvent provenir de sources variées. Elles peuvent être téléchargées d'Internet, scannées ou crées avec un programme de traitement d'image ; ou cela peut être des photos prises avec un appareil photo numérique.
Insérer une image à partir d'un fichier
Dans le cas où l'image est déjà disponible dans un fichier stocké sur l'ordinateur, elle peut être insérée immédiatement dans un document Writer. Apache OpenOffice peut importer divers de types de fichiers vectoriels (dessin de ligne) ou tramés (bitmap). Les plus courants sont GIF, JPEG ou JPG, PNG et BNP. Voir Types de fichier d'image supportés pour une liste complète des types de fichier d'images supportés.
Pour insérer un image à partir d'un fichier, procédez comme suit :
- Déterminez la destination de l'image. Placez le curseur à ou au plus proche du point d'insertion souhaité dans le document.
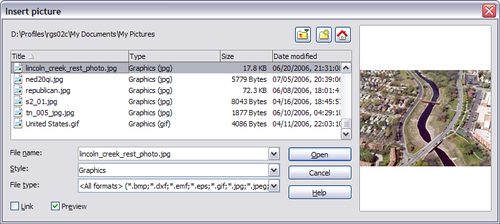
- Dans le menu principal, sélectionnez Insertion > Image > À partir d'un fichier. Cela affiche la boîte de dialogue montrée ci dessous.
- Naviguez jusqu'au fichier à insérer, sélectionnez-le et cliquez sur Ouvrir.
Linking an image file
If the Link option in the Insert picture dialog box is selected, Writer creates a link to the file containing the image, instead of saving a copy of the image in the document. The result is that the image is displayed in the document, but when the document is saved, it will contain only a reference to the image file—not the image itself. The document and the image remain as two separate files, and they are merged together only when you open the document again.
Linking an image has two advantages and one disadvantage:
- Advantage – Linking can reduce the size of the document when it is saved, because the image file itself is not included. The file size is usually not a problem on a modern computer with a reasonable amount of memory, unless the document includes many large graphics files. Writer can handle quite large files.
- Advantage – You can modify the image file separately without changing the document because the link to the file remains valid, and the modified image will appear when you next open the document. This can be a big advantage if you (or someone else, perhaps, a graphic artist) is updating images.
- Disadvantage – If you send the document to someone else, or move it to a different computer, you must also send the image files, or the receiver will not be able to see the linked images. You need to keep track of the location of the images and make sure the recipient knows where to put them on another machine, so the Writer document can find them. For example, you might keep images in a subfolder named Images (under the folder containing the Writer document); the recipient of the Writer file needs to put the images in a subfolder with the same name (under the folder containing the Writer document).
Embedding linked images
If you originally linked the images, you can easily embed one or more of them later if you wish. To do so:
- Open the Writer document in OOo.
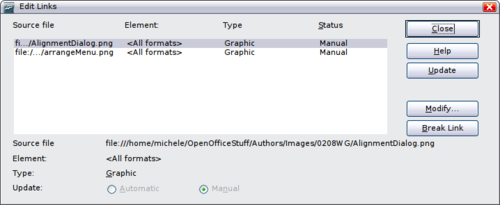
- Choose Edit > Links from the menu bar.
- Click the Break Link button.
- Save the Writer document.
The Edit Links dialog box shows all the linked files. In the Source file list, select the files you want to change from linked to embedded.
Inserting images from other sources
You can insert images from sources other than a file:
- Graphics program
- Scanner
- OOo Gallery
Graphics program
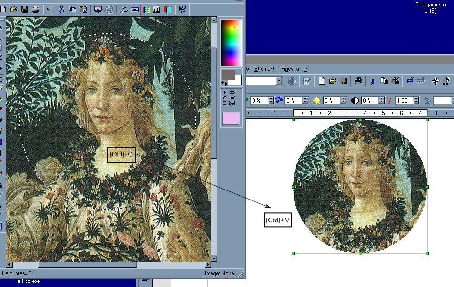
You can use many different graphics programs to edit a graphic file. From these programs, you can select, copy, and paste an image or part of a graphic into an OOo document. The figure below shows an example of this procedure, which can be recreated with these steps:
- In the graphic program window, select an area of the image to be copied.
- Move the cursor over the selected area and press Control+C to copy.
- Switch to the OOo Writer window.
- Click to place the cursor where the graphic is to be inserted.
- Press Control+V to paste the image.
Scanner
If a scanner is connected to your computer, OOo can call the scanning application and insert the scanned item into the Writer document page as an image. To start this procedure, place the cursor where the graphic is to be inserted and select Insert > Picture > Scan > Select Source.
Although this practice is quick and easy, it is unlikely to result in a high-quality image of the correct size. You may get better results by scanning material into a graphics program and cleaning it up there before inserting the resulting image into Writer.
OpenOffice.org Gallery
The Gallery contains objects (graphics and sounds) that you can insert into your documents. The Gallery is available in all components of OOo. For an introduction to the Gallery, see Chapter 11 (Graphics, the Gallery, and Fontwork) in the Getting Started guide.
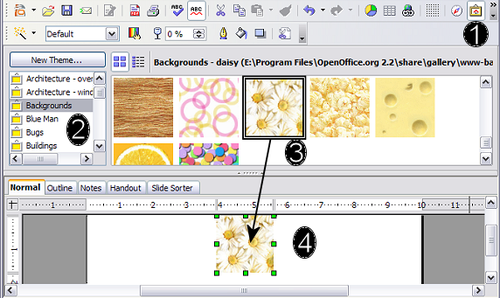
To select a graphic from the Gallery and drag it into the document:
- Click on the Gallery icon
 (located in the right side of the Standard toolbar) or choose Tools > Gallery.
- Select the theme containing the image you want to insert.
- Click on the image with the left mouse button, then drag and drop the image into the document. You can also right-click on the object and select Insert > Copy.
The figure below shows an example of an image dragged from the Gallery.
| Content on this page is licensed under the Creative Common Attribution 3.0 license (CC-BY). |


