Documents Texte avec OpenOffice.org 3.x Writer
En plus du champ Numéro de page dans la barre d'état (décrit dans Barre d'état), Writer
fournit d'autre façons de se déplacer rapidement à travers un document et de trouver des éléments spécifiques en utilisant les nombreuses fonctions du Navigateur, la barre d'outils du Navigateur et les icônes relatives.
Pour ouvrir le Navigateur, cliquez sur son icône ![]() sur la barre d'outils Standard ou appuyez sur F5 ou choisissez Édition > Navigateur dans la barre de menu. Vous pouvez ancrer le Navigateur à l'un des bords de la fenêtre principale de Writer ou le laissez flottant (voir Fenêtres et barres d'outils ancrées / flottantes).
sur la barre d'outils Standard ou appuyez sur F5 ou choisissez Édition > Navigateur dans la barre de menu. Vous pouvez ancrer le Navigateur à l'un des bords de la fenêtre principale de Writer ou le laissez flottant (voir Fenêtres et barres d'outils ancrées / flottantes).
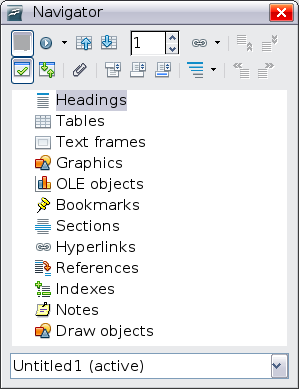
Le Navigateur affiche la liste de tous les titres, tableaux, cadres de texte, images, repères de texte et autres objets contenus dans le document.
Pour masquer la liste des catégories et afficher uniquement les icônes en haut, cliquez sur l'icône Afficher/masquer la zone de liste ![]() . Cliquez sur cette icône à nouveau pour afficher la liste. Cliquez sur le signe + devant l'une des listes pour afficher le contenu de la liste.
. Cliquez sur cette icône à nouveau pour afficher la liste. Cliquez sur le signe + devant l'une des listes pour afficher le contenu de la liste.
Le tableau 1 résume les fonctions des icônes en haut du Navigateur.
Tableau 1: Fonction des icônes du Navigateur
| |
Non actif dans les documents ordinaires. Dans un document maître, bascule entre le document maître et ses sous-documents. |
| |
Ouvre la barre d'outils du Navigateur (voir Utiliser la barre d'outils de navigation). |
| |
Saute à l'élément précédent ou suivant dans le document. Pour sélectionner la catégorie d'éléments voir Utiliser la barre d'outils de navigation. |
| |
Saute au numéro de page dans la boîte. Saisissez le numéro de page ou sélectionnez-le en utilisant les flèches vers le haut ou le bas. |
| |
Mode glisser. Sélectionnez hyperlien, lien ou copie. Voir Choisir un mode glisser pour plus de détails. |
| |
Zone de liste affichée/masquée. Affiche ou masque la liste des catégories. |
| |
Affichage du contenu. Bascule entre l'affichage de toutes les catégories et l'affichage seul de celle qui est sélectionnée. |
| |
Insérer un pense-bête. Voir Définir un pense-bête. |
| |
Saute entre la zone de texte et la zone d'en-tête et de pied de page (si la page en contient).
|
| |
Saute entre une ancre de note et le texte de la note correspondante. |
| |
Choisissez le nombre de niveau de titre à afficher. |
Se déplacer rapidement dans un document
The Navigator provides several convenient ways to move around a document and find items in it:
- To jump to a specific page in the document, type its page number in the box at the top of the Navigator.
- When a category is showing the list of objects in it, double-click on an object to jump directly to that object’s location in the document.
- Use the Previous and Next icons to jump to other objects of the type selected in the Navigation toolbar. (See below for details.)
To see the content in only one category, highlight that category and click the Content View icon. Click the icon again to display all the categories. You can also change the number of heading levels shown when viewing Headings.
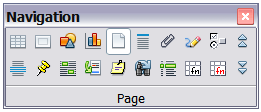
To display the Navigation toolbar, click the Navigation icon [[Image:]] in the Navigator or the small Navigation icon near the lower right-hand corner of the window below the vertical scroll bar.
The Navigation toolbar shows icons for all the object types shown in the Navigator, plus some extras (for example, the results of a Find command).
Click an icon to select that object type. Now all the Previous and Next icons (in the Navigator itself, in the Navigation Toolbar, and on the scroll bar) will jump to the next object of the selected type. This is particularly helpful for finding items like index entries, which can be difficult to see in the text. The names of the icons (shown in the tooltips) change to match the selected category; for example, Next Graphic or Next Bookmark.
You can arrange chapters and move headings in the document by using the Navigator.
- Click the Content View icon to expand the headings, if necessary.
- (Optional) If you have several subheading levels, you can more easily find the headings you want, by changing the Heading Levels Shown selection to show only 1 or 2 levels of headings.
- Click on the heading of the block of text that you want to move and drag the heading to a new location on the Navigator, or click the heading in the Navigator list, and then click either the Promote Chapter or Demote Chapter icon. All of the text and subsections under the selected heading move with it.
- To quickly change the outline level of a heading and its associated subheadings, select the heading in the Navigator, and then click either the Promote Level or Demote Level icon. This action does not change the location of the heading, only its level.
To move only the selected heading and not the text associated with the heading, hold down Control, and then click the icon.
To increase the outline level of only the selected heading, but not its associated subheadings, hold down Control, and then click the icon.
Setting reminders
One of the little known features of Writer which you may find quite useful is the possibility of jumping between reminders. Reminders are not highlighted in any way in the document, so you cannot see where they are, but they are a handy tool.
To set a reminder at the cursor's current location, click on the ![]() icon in the Navigator. You can set up to 5 reminders in a document (setting another causes the first to be deleted). To jump between reminders, first select the same icon on the Navigation toolbar. Now the Previous and Next icons are active for reminders.
icon in the Navigator. You can set up to 5 reminders in a document (setting another causes the first to be deleted). To jump between reminders, first select the same icon on the Navigation toolbar. Now the Previous and Next icons are active for reminders.
Choosing drag mode
Sets the drag and drop options for inserting items into a document using the Navigator.
Insert As Hyperlink
Creates a hyperlink when you drag and drop an item into the current document.
Insert As Link
Inserts the selected item as a link where you drag and drop in the current document. Text is inserted as protected sections. However, you cannot create links for graphics, OLE objects, references, or indexes using this method.
Insert As Copy
Inserts a copy of the selected item where you drag and drop in the current document. You cannot drag and drop copies of graphics, OLE objects, or indexes.
| Content on this page is licensed under the Creative Common Attribution 3.0 license (CC-BY). |


