Positioning graphics within the text
When you add a graphic to a text document, you need to choose how to position the graphic with respect to the text and other graphics.
Graphic arrangement refers to the placement of a graphic behind or in front of other graphics or text. Alignment refers to the vertical or horizontal placement of a graphic in relation to the page, frame, paragraph, or character to which it is anchored. Text wrapping refers to the relation of graphics to surrounding text, which may wrap around the graphic on one or both sides, be overprinted behind or in front of the graphic, or treat the graphic as a separate paragraph or character.
Arranging and aligning graphics
You can arrange and align graphics using commands from:
- The main menu: Format > Alignment (or Arrange, Wrap, Anchor, Flip, ...)
- By right-clicking on the picture, then Format > Alignment (or Arrange, Wrap, or Anchor)
- Frame (with the Graphics frame style applied) toolbar
- Picture dialog box
Frame toolbar
When you select a graphic, the Frame toolbar may be displayed.
Here you can click icons to apply many arrangement, alignment, wrapping, anchoring, formatting, and other choices.
1 Apply Style | 2 Wrap Off | 3 Page Wrap | 4 Wrap Through | 5 Align Left | 6 Center Horizontal | 7 Align Right | 8 Top | 9 Center | 10 Bottom | 11 Borders | 12 Line Style | 13 Line Color (of the border) | 14 Background Color | 15 Frame Properties | 16 Bring to Front | 17 Send to Back | 18 Change Anchor | 19 Link Frames | 20 Unlink Frames
Frame toolbar (Graphics object)
Picture dialog box
Click on the graphic to select it and then click Format > Picture, or right-click on the graphic and then click Picture on the pop-up menu, to display the Picture dialog box (Figure 11). Here you can specify the characteristics of the graphic and its placement in detail.
Wrapping text around graphics
On the main menu, click Format > Wrap. The Wrap menu options provide several possibilities:
- Alternate paragraphs and graphics, maintaining a separation between them (Wrap Off).
- Wrap text around the graphics (Page Wrap or Optimal Page Wrap).
- Put a semi-transparent graphic over the text (Wrap Through).
- Add a graphic in the background (In Background).
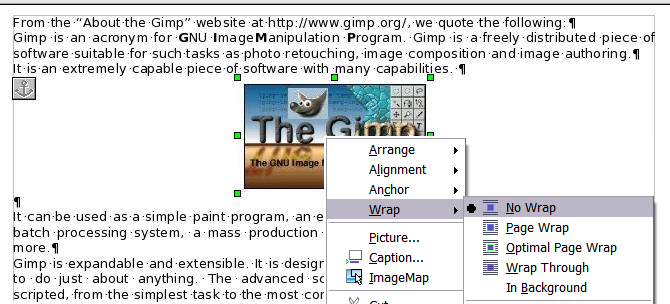
Often you need to insert graphics with no text around them, as in this chapter. To set the position of an image to the Wrap Off format, follow these steps:
- Select a graphic by clicking on it.
- Right-click to display the context menu and move the mouse pointer to Wrap to display the various wrap modes.
- Select No Wrap.
The figure below shows an example of this operation.

Changing the wrap of a graphic
When formatting some documents, such as newsletters, you may want to put photos mixed with text or just want to add some decorative images. The Page Wrap option may satisfy this need. The figure below shows an example of a graphic insertion with the Page Wrap option.

Inserting a graphic using the Page Wrap option
When an image is inserted with the Page Wrap option, you can move it anywhere on the page. The text will be automatically adjusted around the image, like water around a sailing boat.
The Optimal Page Wrap option is similar to Page Wrap, but it maintains the text positioned beside the image. The position is decided automatically in order to optimize the relative position between text and image.
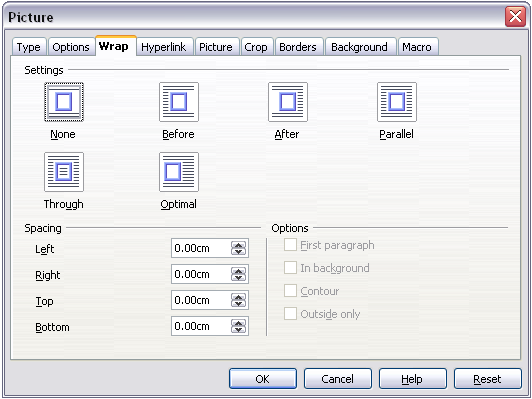
Double-clicking on an image pops up the Picture dialog box where you can set all the parameters affecting the image (see figure below). On the Wrap page, you can change the setting for the optimal page wrap.

The Wrap page of the Picture dialog box
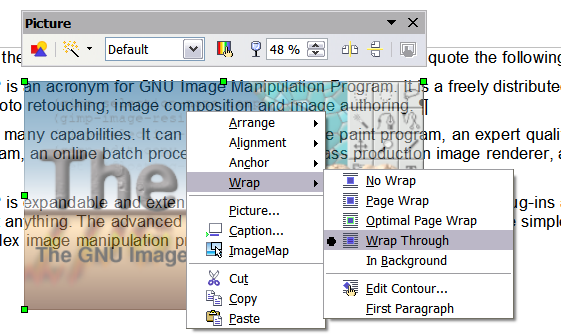
The Wrap Through option lets you also insert an image overlapping the text. In this case, some part of the text will be hidden, unless you change the transparency of the image.
After changing the transparency, the final result looks like a decal applied over the text, as shown below, where the transparency has been set to 48% in the Transparency spinbox in the Picture toolbar. The words under the image are visible but appear lighter than the rest of the text.

Transparent image added over the text
You can obtain a similar result if you set a graphic's wrap to the In Background format. In this case all the text will be clearly readable, with characters that have the same intensity. However, the background graphic should not be dark; otherwise, the text could be difficult to read. You can also use the Transparency spinbox to control the "transparency”.
| Content on this page is licensed under the Creative Common Attribution 3.0 license (CC-BY). |
