Numbering pages
Contents
Introduction to page numbering
To automatically number pages:
- Insert a header or footer, as described in Creating headers and footers.
- Place the cursor in the header or footer where you want the page number to appear and choose Insert > Fields > Page Number.
Including the total number of pages
To include the total number of pages (as in page 1 of 12):
- Type the word page and a space; then insert the page number as above.
- Press the spacebar once, type the word of and add a space; then choose Insert > Fields > Page Count.
| The Page Count field inserts the total number of pages in the document, as shown on the Statistics page of the document's Properties dialog box (File > Properties). If you restart page numbering anywhere in the document, then the total page count may not be what you want. |
See Problems with restarting page numbering.
Restarting page numbering
Often you will want to restart the page numbering at 1, for example, on the page following a title page or a table of contents. In addition, many documents have the front matter (such as the table of contents) numbered with Roman numerals and the main body of the document numbered in Arabic numerals, starting with 1.
You can restart page numbering in two ways.
Method 1:
- Place the cursor in the first paragraph of the new page.
- Choose Format > Paragraph.
- On the Text Flow page of the Paragraph dialog box, check Insert in the Breaks area.
- In the Type drop-down list, select Page.
- In the Position drop-down list, select Before or After to position where you want to insert the page break.
- Check With Page Style and specify the page style to use.
- Specify the page number to start from and then click OK.
Method 2:
- Place the cursor in the first paragraph of the new page.
- Choose Insert > Manual break.
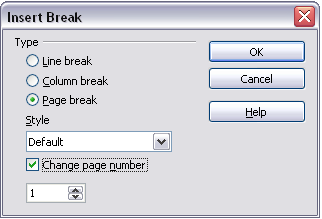
- Page break is the default selected on the Insert Break dialog box.
- Choose the required page in the Style drop-down list.
- Check Change page number.
- Specify the page number to start from and then click OK.
 Restarting page numbering after a manual page break.

The following derives from experience with OOo 3.2.1:
If the "Default" page style doesn't behave as desired when applied to both sections, create two new page styles (which could be based on Default) with names such as "BodyPage" and "FrontMatter." Apply the BodyPage style to the page you want to start as "1" in the Arabic page number sequence. Apply the FrontMatter page style to the first page in the document you want to start with Roman page numbers.
When creating either page style, make the "Next Page" style the same as the one you create. That is, a FrontMatter page is followed by a FrontMatter format--until changed by a page break and a new style, such as BodyPage, which can continue to the end of the document.
When creating a page style based on Default, check to be sure you are not creating a paragraph format based on the Default paragraph style. Select from the list of Page Styles, not from Paragraph Styles where there is also a Default.
Changing the format of page numbers
To set the page number to display in Roman numerals, you need to specify the format of numbers in the page style.
On the Page page of the Page Style dialog box, in the Layout settings section, select i, ii, iii, ... from the Format drop-down list.

Problems with restarting page numbering
Restarting page numbering may lead to two problems.
- The Statistics page in the document's Properties (File > Properties) always displays the total number of pages in the document, which may not be what you want to appear in the Page Count field.
- When page numbering is restarted, OOo always make sure that an odd-numbered page is a right page and an even-numbered page is a left page. It does this by inserting a blank page, if necessary. Sometimes this blank page is not desired, particularly when creating PDFs or when printing single sided.
Solving the page count problem
Suppose you know exactly how many pages are not to be included in the page count. (You want one page to be excluded in the page count for the following example.)
Instead of inserting a Page Count field, you can do the following:
- Position the cursor where you want the page count to appear.
- Press F2 to open the formula bar, just above the horizontal ruler in the main Writer window (see Figure 44).
- After the equal sign, type page -1. If you want to exclude multiple pages, substitute the number of excluded pages for 1 in the formula.
- Press Enter to close the formula bar and insert the resulting field into the document.
-
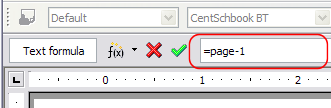 Formula bar.

If you do not know the total number of pages in advance, then one approach is to create a set reference on the last page and then insert a cross reference to it. Refer to Chapter 14 (Working with Fields) for more information on setting references and inserting cross references.
To create a set reference on the last page:
- Go to the last page (Ctrl+End).
- Choose Insert > Cross-reference.
- On the References page of the Fields dialog box, select Set Reference in the Type column.
- In the Name box, enter LastPage.
- Click Insert. LastPage is now listed in the Selection column.
-
 Setting a reference on the last page of the document.

To insert a cross-reference to the last page in the header or footer where you want to refer to the total number of pages:
- Position the cursor at the desired location—for example after the space added after of in the header or footer, as in page xx of yy.
- Choose Insert > Cross-reference.
- On the References page of the Fields dialog box, select Insert Reference in the Type column and LastPage in the Selection column. LastPage now appears in the Name box.
- In the Format column, select As page style. Click Insert.
| Do not delete the reference set at the end of the document. If you do, the cross-reference will not work. If a field, such as a cross-reference, does not automatically update, select the text containing the field and press F9. |
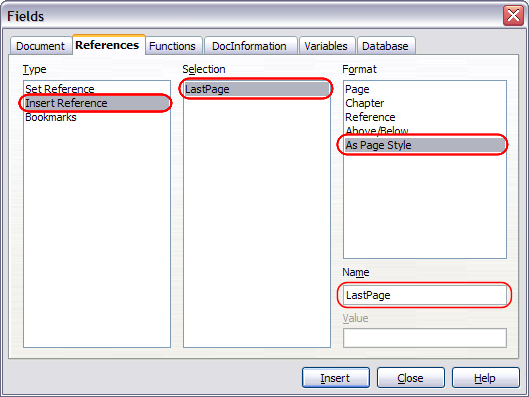 Inserting a cross-reference to the last page of a document.

Numbering portrait and landscape pages
To create page numbers on portrait and landscape pages in the same place and orientation:
- Refer to “Portrait headers on landscape pages" on page 28 to create a landscape page style and landscape header or footer styles. When creating the page style, check the Use dynamic spacing check box in the Spacing area in the Header or Footer pages of the Page Style dialog box.
- Insert the page break and choose the landscape page style; do not change the page numbering.
- In the relevant header or footer, insert the page number field (Insert > Fields > Page Number).
Numbering the first page something other than 1
Sometimes you may want to start a document with a page number greater than 1. For example, you may be writing a book, with each chapter in a separate file. Chapter 1 may start with page 1, but Chapter 2 could begin with page 25 and Chapter 3 with page 51.
Follow these instructions to start the page numbering in a document at a number greater than 1. (These instructions are for a page number in a footer, but you could use a header instead.)
| Do not set a starting page number that is an even number because you will end up with a blank page before the first page when you print the file or export it as a PDF. |
- Choose Insert > Footer > [page style] to activate the footer. (If the page style is already checked in the Footer menu, point to it and click OK in the dialog box that appears. Then point to that page style again to select it.)
- The cursor is now in the footer. To insert the page number, choose Insert > Fields > Page Number. The page number will be 1.
- Click in the first paragraph in the text area or type a paragraph of text.
- Choose Format > Paragraph (or right-click and choose Paragraph from the pop-up menu) to display the Paragraph dialog box.
- On the Text Flow page, in the Breaks section, select Insert and select Page in the Type drop-down list. Select With Page Style and the page style you are using for the first page of the document.
- The Page number field is now active. Type the page number you want to start with. Click OK to close the Paragraph dialog box.
Numbering pages by chapter
Technical documents often include the chapter number with the page number in the header or footer. For example, 1-1, 1-2, 1-3, ...; 2-1, 2-2, 2-3, ...
To set up this type of page numbering in OOo, you need to do three things:
- Ensure that your chapter titles are all identified by the same paragraph style, for example, the Heading1 style.
- Use Tools > Outline Numbering to tell OOo what paragraph style you are using for Level 1 in your outline, and specify “1,2,3" in the Number box.
- Insert the chapter number in your document. To do this:
- Place the cursor in the header or footer just before the page number you inserted earlier, and choose Insert > Fields > Other from the menu bar.
- On the Fields dialog, go to the Document page. Select Chapter in the Type list, Chapter number in the Format list, and 1 in the Layer box. Click Insert.
- Type a hyphen or other punctuation between the chapter number and the page number.


For more information, see "Choosing paragraph styles for outline levels" and "Including chapter or section information in page headers" in Chapter 7 (Working with Styles).
| Content on this page is licensed under the Creative Common Attribution 3.0 license (CC-BY). |