Aids for positioning objects
Draw has various tools to help you arrange the objects with respect to each other. Here we explore some of the more important ones.
Moving an object to the front or to the back
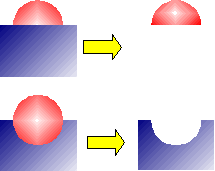
When you combine or merge objects, the end result varies drastically depending on which object is “in front” and which one is “in the back”. In Figure 6 you can see the difference.
If you imagine several objects stacked one on top of the other, the one referred to as “Front” is the one on top of the stack. The one referred to as “Back” is the one on the very bottom of the stack.
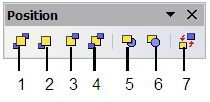
First select an object, then click on ![]() to open the Position toolbar from the main Drawing toolbar.
to open the Position toolbar from the main Drawing toolbar.

1 Bring to Front 2 Bring Forward 3 Send Backward 4 Send to Back 5 In Front of Object 6 Behind Object 7 Reverse
Figure 7: The floating Position toolbar
![]() brings the selected object to the front of the group.
brings the selected object to the front of the group.
![]() brings the selected object one step upwards.
brings the selected object one step upwards.
![]() brings the selected object one step backwards.
brings the selected object one step backwards.
![]() brings the selected object to the back of the group.
brings the selected object to the back of the group.
![]() moves the selected object in front of another chosen object.
moves the selected object in front of another chosen object.
![]() moves the selected object behind another chosen object.
moves the selected object behind another chosen object.
Click first on the object you want to change in position. Click next on the icon and then move the mouse over the other object. The mouse cursor changes into a hand and the outline of the second object becomes a dashed line (see below). Clicking on this object completes the rearrangement of position.
![]() reverses the order of the selected objects.
reverses the order of the selected objects.
Aligning objects
Click on ![]() to open the floating Align toolbar. This toolbar helps you position objects with respect to each other.
to open the floating Align toolbar. This toolbar helps you position objects with respect to each other.

1 Align left 2 Center horizontally 3 Align right 4 Align top 5 Center vertically 6 Align bottom
Figure 8: The floating Align toolbar
Distributing the distance and space between objects
Select at least three objects. Now you are able to select the option Distribution on the Modify menu or from the right-click menu. A dialog containing a number of selections appears (see Figure 9). The use of each option is indicated by the tooltip (under Windows) or by clicking the Help button in the Distribution dialog.
Horizontal distribution
None. Does not distribute the objects horizontally.
Left. The left edges of the objects are evenly spaced from one another.
Center. The horizontal centers of the objects are evenly spaced from one another.
Spacing. The horizontal spacing between the objects is evenly distributed.
Right. The right edges of the objects are evenly spaced from one another.
Vertical distribution
None. Does not distribute the objects vertically.
Top. The top edges of the objects are evenly spaced from one another.
Center. The vertical centers of the objects are evenly spaced from one another.
Spacing. The vertical spacing between the objects is evenly distributed.
Bottom. The bottom edges of the objects are evenly spaced from one another.
Figure 10 shows four objects before distribution of spacing.
The result of the selections made in Figure 9 (change to equal horizontal spacing, no vertical change) is shown in Figure 11.
| Content on this page is licensed under the Creative Common Attribution 3.0 license (CC-BY). |


