The Styles and Formatting window
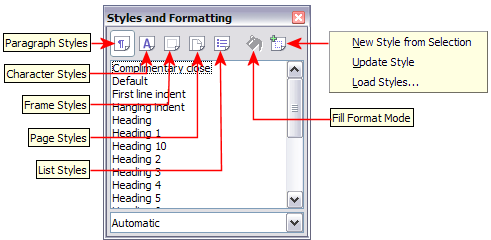
Styles are available through a floating or dockable window called Styles and Formatting. This window is at the center of styles management. Do not worry if, at first, some contents of this section seem obscure while progressing through this or the next chapter. This guide describes how to use all these functions.
To open the Styles and Formatting window, do any one of the following:
- Click on the
 icon located at the left-hand end of the formatting toolbar.
- Select Format > Styles and Formatting.
- Press F11.
| You can move the Styles and Formatting window to a convenient position on the screen or dock it to an edge. |
Style selection basics
The first five icons at the top of the Styles and Formatting window select the category of styles to work on. Click on one of these icons to display a list of styles in that category, such as paragraph or character styles, in the main window.
To apply a character style to existing text, select the text and then double-click on the name of the style in the Character Styles list. To apply any other style, put the cursor in the paragraph, frame, or page you want to modify and double-click on the name of the style in the corresponding section. You can select more than one paragraph or frame and apply the same style to all of them at the same time.
Using Fill Format mode
The sixth icon at the top of the Styles and Formatting window activates the Fill Format mode. Use Fill Format to apply a style to many different areas quickly without having to go back to the Styles and Formatting window and double-click every time. This method is useful for formatting many scattered paragraphs, words, or other items with the same style, and it may be easier to use than making multiple selections first and then applying a style to all of them.
- Open the Styles and Formatting window and select a style.
- Click the Fill Format Mode icon
 .
.
- To apply a paragraph, page, or frame style, hover the mouse over the paragraph, page, or frame and click. To apply a character style, hold down the mouse button while selecting the characters. Clicking on a word applies the character style for that word.
- Repeat step 3 until you made all the changes for that style.
- To quit the Fill Format mode, click the icon again or press the Esc key.
| When this mode is active, a right-click anywhere in the document undoes the last Fill Format action. Be careful not to accidentally right-click and mistakenly undo actions you want to keep. |
New Style from Selection, Update Style, and Load Styles functions
The last button in the toolbar of the Styles and Formatting window is a multipurpose button that gives access to three different functions: New Style from Selection, Update Style, and Load Styles.
Using New Style from Selection
Use the first function of the multipurpose button to create a new style from the formatting of an object in the current document. For instance, you can change the formatting of a paragraph or frame until it appears as you like, and then you can turn that object’s formatting into a new style. This procedure can save time because you do not have remember all the formatting settings you want, as is necessary when creating a new style with the Style dialog box. Besides, unlike when setting the formatting parameters in dialog box pages as you will learn to do later, you can immediately see how the objects will look like when formatted with the style you are creating.
Follow these steps to create a new style from a selection:
- Change the formatting of the object (paragraph, frame, etc.) to your liking.
- From the icons at the top of the window, choose the type of style to create (paragraph, character, and so on).
- In the document, select the item to save as a style.
- Go back to the Styles and Formatting window and click the New Style from Selection icon.
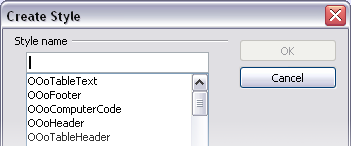
In the Create Style dialog box, enter a name for the new style. The list shows the names of existing custom styles of the selected type, if any. Click OK to save the new style.
Update Style (from a selection)
Let’s use paragraph styles as an example.
- Create a new paragraph (or modify an existing paragraph) and edit all the properties you want to go into the style (such as indentation, font properties, alignment, among others).
- Select the paragraph by clicking anywhere in the paragraph.
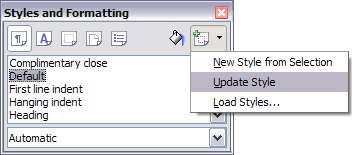
- In the Styles and Formatting window, select the style you want to update (single-click, not double-click) and then click on the New Style from Selection icon and select Update Style.
The procedure to update another type of style (character, page, or frame styles) is the same. Just select the item in question, select the style you want to update, and choose Update Style.
Load Styles (from a template or document)
The last option in the New Style from Selection icon is used to copy styles into the current document by loading them from a template or another document. This method copies all styles, or groups of styles, at one time.
- Open the document to copy styles into.
- In the Styles and Formatting window, click on the New Style from Selection icon and then on Load Styles.
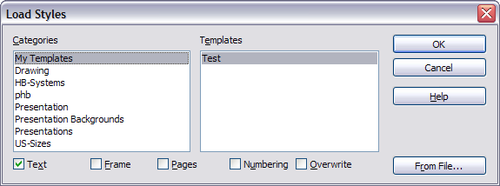
- In the Load Styles dialog box, find and select the template to copy styles from. Click on the From File button if the styles you want are contained in a text document rather than a template. In this case, a standard file selection dialog box opens up, allowing you to select the desired document.
- Select the check boxes for the types of styles to be copied. If you select Overwrite, the styles being copied will replace any styles of the same names in the target document.
- Click OK to copy the styles.
Using the visible styles filters
At the bottom of the Styles and Formatting window, use the drop-down menu to select a filtering criterion for the contents of the main body of the window. Normally, you will find that only a handful of styles are needed in any given document, and it makes sense to have only these styles shown.
So, at the beginning of the writing process, you may want to have access to all the available styles (by selecting All Styles). However, as the document develops, it is useful to reduce the size of the list displayed to only the styles already in use (by selecting Applied Styles). If you work on a document where you want to apply special-purpose styles only (such as those styles used in writing this user guide), select instead Custom Styles. The Hierarchical Styles view is most useful when modifying styles as it reveals which styles are linked together. This topic is discussed in more detail in Chapter 7 (Working with Styles).
If you select the Paragraph Styles view in the Styles and Formatting window, the drop-down menu contains many more filtering options so you can view, for example, only Text Styles, Special Styles, and so on.
Drag-and-drop a selection to create a style
Another little known property of the Styles and Formatting window is the capability of creating a new style with a simple drag-and-drop of a text selection into the Styles and Formatting window.
- Open the Styles and Formatting window.
- Select the style category you are going to create (for example a character style) using one of the five icons in the top left part of the window.
- Select the object you want to base the style on and drag it to the Styles and Formatting window. The cursor changes its shape indicating whether the operation is possible or not.
- In the Create Style dialog box, enter a name for the new style. The list shows the names of existing custom styles of the selected type, if any. Click OK to save the new style.
| Content on this page is licensed under the Creative Common Attribution 3.0 license (CC-BY). |


