Utilisation de cadres pour la mise en page
- Choix d'une méthode de mise en page
- Définition d'une mise en page de base avec des styles
- Modification des marges de la page
- Utilisation de colonnes pour la mise en page
- Utilisation de cadres pour la mise en page
- Utilisation de section pour la mise en page
- Création d'en-têtes et de pieds de page
- Numérotation des pages
Contents
Introduction
Les cadres peuvent être très utiles lors de la production d'une lettre d'information ou pour d'autres documents qui utilisent une mise en page complexe. Les cadres peuvent contenir du texte, des tableaux, des colonnes multiples, des images et d'autres objets.
Utilisez des cadres lorsque vous avez besoin de :
- Positionnez quelque chose à un endroit particulier de la page, par exemple un logo ou une accroche à l'un des angles de la page
- Permettre au texte sur une page de continuer sur une autre page ailleurs dans le document (autre que la page suivante), en liant le contenu d'un cadre à un autre de façon à ce que le contenu s'enchaîne entre eux à mesure que vous éditez le texte.
- Adapter le texte autour d'un objet, tel qu'une photographie.
Parce que OpenOffice.org ne permet pas de définir des styles de page avec des cadres répétitifs, envisagez de faire une ébauche rapide des mises en page de base dont vous avez besoin, indiquant la position approximative des différents cadres et de leur propos. Essayez de garder le nombre de mises en page différentes le plus faible possible pour éviter le chaos dans votre réalisation.
Attachez une attention spéciale au positionnement des cadres. Beaucoup des styles pré-définis ont par défaut un alignement centré. C'est le plus petit dénominateur commun de la réalisation ; centrer tous les cadres semble raisonnable dans la plupart des cas mais est rarement le meilleur choix.
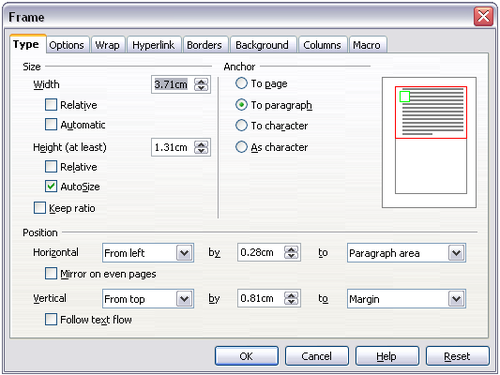
L'un des moyens les plus efficaces visuellement de positionner un cadre est d'aligner sa marge de gauche avec celle du paragraphe au-dessus de lui. Pour parvenir à cet effet, insérez le cadre dans un paragraphe vide ayant le même style que le paragraphe au-dessus. Puis, sélectionnez Insertion > Cadre > Type > Position > Horizontale > De gauche pour positionner le cadre exactement là où vous le souhaitez.
Vous devez également penser au type d'habillage et à l'espacement entre le cadre et le texte. Au lieu de placer le cadre près du texte, utilisez l'onglet Adpatation pour ajouter de l'espace entre eux.
Vous pouvez formater ces cadres individuellement ou définir et appliquer des styles de cadre ; voir le Chapitre 7 (Travail avec les styles).
Example: Using a frame to center text on a page
Although you can center text horizontally as part of a paragraph style or by using manual formatting, those methods do not work for vertical centering. To center text vertically, you need to place the text in a frame and then center the frame vertically on the page.
Creating frames
You can create a frame in several ways, depending on your needs.
- Choose Insert > Frame) to create an empty frame. The Frame dialog box appears. You can click OK and come back to customize it later, or you can set the frame's characteristics at this stage.
- Select text or a graphic, choose Insert > Frame, and click OK to create a frame containing the selection. The selected text is automatically deleted from the normal text flow and inserted into the frame, and the Frame dialog box appears.
- Insert a picture or other object by selecting Insert > Picture > From file or Insert > Object to start the process to insert a picture or object. The item inserted automatically appears in a frame, but the Frame dialog box does not appear.
- Use the Insert Frame Manually icon on the Insert toolbar (go to View > Toolbars > Insert to display it), select the number of frames in the drop-down menu, and drag the mouse to draw the frame.
When you release the mouse button, a box appears where the cursor is located in the document. This box represents the frame: an area isolated from the main document.
To add content to a frame, first deselect the frame by clicking somewhere else on the page. Then, click inside the frame so that the cursor shifts its focus there. Now add content just like you would on the main page. When you are done, deselect the frame.
Moving, resizing, and changing frame attributes
When an object is added to Writer, it is automatically enclosed in a frame of a predetermined type. The frame sets how the object is placed on the page, as well as how it interacts with other elements in the document. You can edit the frame by modifying the frame style it uses or by using a manual override when a frame is added to the document. Frame styles are discussed in Chapter 7 (Working with Styles).
To change the size or location of a frame, first select the frame, then use either the mouse or the Frame dialog box. Using the mouse is faster but less accurate. You might use the mouse for gross layout and the dialog box for fine-tuning.
You can resize the frame manually (by clicking on the green squares and dragging to the appropriate size) or start adding content to it (the frame will resize automatically if, for example, you add a large picture to it) or go back to the Frame dialog box and set the size and other characteristics.
To change the location of the frame using the mouse, drag and drop one of the edges or having the cursor anywhere within the frame. (The I-bar cursor changes to a four-headed arrow when properly positioned for a drag-and-drop move.) To change the size of the frame, drag one of the handles. Drag a handle on one of the sides to enlarge or reduce the text frame in one dimension only; drag a corner handle to enlarge or reduce it in both dimensions.
These resizing actions distort the proportions of the frame. Holding down the Shift key while dragging one of the handles makes the frame keep the same proportions.
You can open the Frame dialog box at any time by selecting the frame, right-clicking, and choosing Frame from the pop-up menu.
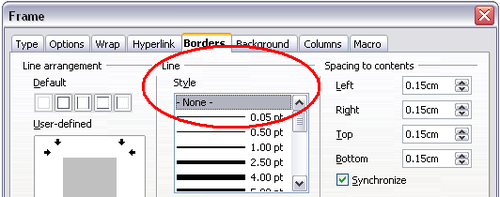
To remove the default border on a newly created frame, open the Frame dialog box, go to the Borders page, and under Line, select None. Alternatively, you can assign a borderless frame style to the frame; see Chapter 7 (Working with Styles), for information on frame styles.
| Do not confuse a frame's border with the text boundaries that are made visible using the View menu (by checking View > Text Boundaries). |
Anchoring a frame
Using the Frame dialog box (or by right-clicking and pointing to Anchor), you can anchor a frame to a page, paragraph, or character, or you can anchor it as a character.
To Page
The frame keeps the same position in relation to the page margins. It does not move as you add or delete text. This method is useful when the frame does not need to be visually associated with a particular piece of text. It is often used when producing newsletters or other documents that are very layout-intensive.
To Paragraph
The frame is associated with a paragraph and moves with the paragraph. It may be placed in the margin or another location. This method is useful as an alternative to a table for placing icons beside paragraphs.
To Character
The frame is associated with a character but is not in the text sequence. It moves with the paragraph but may be placed in the margin or another location. This method is similar to anchoring to a paragraph.
As Character
The frame is placed in the document like any other character and, therefore, affects the height of the text line and the line break. The frame moves with the paragraph as you add or delete text before the paragraph. This method is useful for adding a small icon in sequence in a sentence. It is also the best method for anchoring a graphic to an empty paragraph so it does not move around the page in unexpected ways.
Linking frames
You can link several frames to each other even when they are on different pages of a document. The contents will automatically flow from one to the next. This technique is very useful when designing newsletters, where articles may need to be continued on a different page.
To link one frame to another:
- Select the frame to be linked from.
- Click the Link Frames icon inline:Graphic151.png on the object bar.
- Click the next frame in the series (which must be empty).
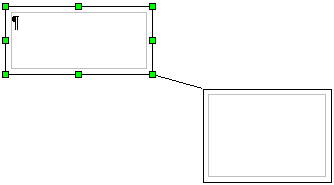
When a linked frame is selected, any existing links are indicated by a connecting line, as shown below.
The height of a frame that is being linked from is fixed; you can change this height manually or by using the Frame dialog box, but it does not automatically adjust to the size of the contents (that is, the AutoHeight attribute is disabled). Only the last frame of a chain can adapt its height to the content.
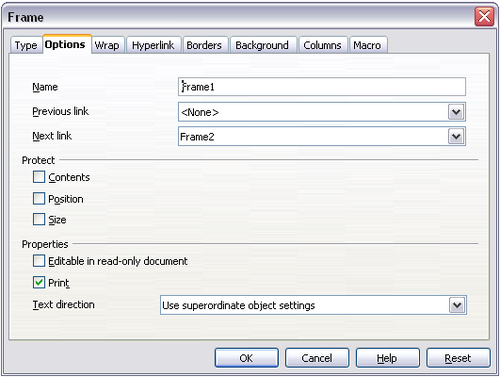
The Options page of the Frame dialog box shows the names of the selected frame and any frames it is linked to or from. You can change this information here. On this page, you can also select check boxes to protect the contents, position, and size of the frame.
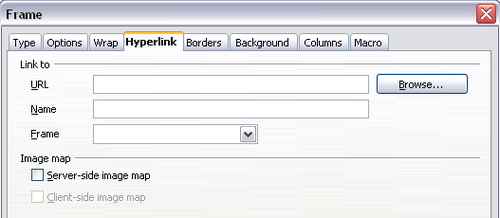
On the Hyperlink page, you can specify the file for the hyperlink to open. This file can be on your machine, a network, or the Internet.
The Wrap, Borders, Background, Columns, and Macro pages of the Frame dialog box are the same as those for frame styles. Refer to Chapter 7 (Working with Styles) for details.
| Content on this page is licensed under the Creative Common Attribution 3.0 license (CC-BY). |

