Définition d'une mise en page de base avec des styles
- Choix d'une méthode de mise en page
- Définition d'une mise en page de base avec des styles
- Modification des marges de la page
- Utilisation de colonnes pour la mise en page
- Utilisation de cadres pour la mise en page
- Utilisation de section pour la mise en page
- Création d'en-têtes et de pieds de page
- Numérotation des pages
Dans Writer, les styles de page définissent la mise en page basique de toutes les pages, incluant la taille de la page, les marges, l'emplacement des en-têtes et pieds de page, les bordures et l'arrière-plan, le nombre de colonnes, et ainsi de suite.
Writer vient avec plusieurs styles de page, sur lesquels vous pouvez construire ou les modifier et vous pouvez définir de nouveaux (personnalisés) styles de page. Vous pouvez avoir un ou plusieurs styles de page dans un seul document.
Pour modivier la mise en page d'une page individuelle, soit vous définissez un nouveau style de page, soit vous utilisez l'une des techniques (sections, cadres ou tableaux) décrites plus loin dans ce chapitre.
Ce chapitre décrit certains usages des styles de pages. D'autres usages sont discutés dans le Chapitre 6 (Introduction aux styles). La boîte de dialogue Style de page est couverte en détail dans le Chapitre 7 (Travail avec les styles).
Inserting a page break without switching the style
In many documents (for example, a multi-page report), you may want the text to flow from one page to the next as you add or delete information. Writer does this automatically, unless you override the text flow using one of the techniques described earlier.
If you do want a page break in a particular place, for example, to put a heading at the top of a new page, here is how to do it:
- Position the cursor in the paragraph you want to be at the start of the next page. Right-click and choose Paragraph in the pop-up menu.
- On the Text Flow page of the Paragraph dialog box, in the Breaks section, check Insert. Do not check With Page Style.
- Click OK to position the paragraph at the start of the next page.

Defining a different first page for a document
Many documents, such as letters and reports, have a first page that is different from the other pages in the document. For example, the first page of a letterhead typically has a different header, as shown below, or the first page of a report might have no header or footer, while the other pages do. With OOo, you can define the style for the first page and specify the style for the following page to be applied automatically.

As an example, we can use the First Page and Default page styles that come with OOo. The diagram below shows what we want to happen: the first page is to be followed by the default page, and all the following pages are to be in the Default page style.
-
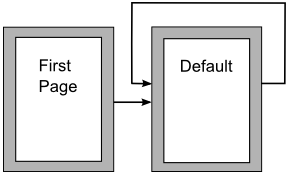 Flow of page styles.

To set up this sequence:
- Open the Styles and Formatting window. (You can choose one of the following: click the Styles and Formatting icon
 located at the left-hand end of the object bar, choose Format > Styles and Formatting, or press F11.)
 - On the Styles and Formatting window, click on the Page Styles icon
 (fourth from the left) to display a list of page styles.
 - Right-click on First Page and select Modify from the pop-up menu.
- On the Organizer page of the Page Style dialog box (Figure 5), look at the Next Style property. This property defines what the page style for the next page will be. It should be set to Default, but if it is not, you can change the next style by clicking on the drop-down button and choosing Default from the list of page styles.
- On the other pages of this dialog box, you can turn on or off the header and footer for the first page and define other characteristics, such as columns, a page border, or a page background. For more information, see Chapter 7 (Working with Styles).
- Click OK to save the changes.


Setting the Next Style property for a page style.
Changing page orientation within a document
A document can contain pages in more than one orientation. A common scenario is to have a landscape page in the middle of a document, whereas the other pages are in a portrait orientation. Here are the steps to achieve it.
Setting up a landscape page style
- Note the page style that is current and the margin settings. (You can find the margin settings on the Page page of the Page Style dialog box, as shown in step 4.)
- Create a new style. (Right-click on the current page style in the Styles and Formatting window and choose New.)
- On the Organizer page of the Page Style dialog box, name (by typing in the Name field) this new style Landscape and set the Next Style property to Landscape (to allow for having more than one sequential landscape page).
- On the Page page of the Page Style dialog box, set the Orientation to Landscape. The width and height attributes of the page will automatically change.
- Change the margins so that they correspond with the margins of the portrait page. That is, the portrait top margin becomes the landscape left margin, and so on.
- Click OK to save the changes.


Inserting a landscape page into a portrait document
Now that you have defined the Landscape page style, here is how to apply it.
- Position the cursor in the paragraph or table at the start of the page that is to be set to landscape. Right-click and choose Paragraph or Table, respectively, in the pop-up menu.
- On the Text Flow page of the Paragraph dialog box or the Table Format dialog box, select Insert (or Break for a table) and With Page Style. Set the Page Style property to Landscape. Click OK to close the dialog box and to apply the new page style.
- Position the cursor in the paragraph or table where the page is to return to portrait orientation and change the properties of that paragraph or table properties so that With Page Style is the portrait page style that was used before the Landscape page style.
- Click OK to return to the previous portrait page style.


| Content on this page is licensed under the Creative Common Attribution 3.0 license (CC-BY). |