Difference between revisions of "Documentation/OOoAuthors User Manual/Getting Started/Toolbars"
| (11 intermediate revisions by 2 users not shown) | |||
| Line 1: | Line 1: | ||
| − | {{ | + | {{DISPLAYTITLE:Toolbars}} |
| − | | | + | {{Documentation/MenuTOC |
| − | | | + | |ShowPrevNext=block |
| − | + | |PrevPage=Documentation/OOoAuthors User Manual/Getting Started/Menus | |
| − | + | |NextPage=Documentation/OOoAuthors User Manual/Getting Started/Using dockable/floating windows and toolbars | |
| + | }} | ||
| + | __NOTOC__ | ||
The top toolbar (default position) is called the ''Standard toolbar''. The Standard toolbar is consistent across the OpenOffice.org applications. | The top toolbar (default position) is called the ''Standard toolbar''. The Standard toolbar is consistent across the OpenOffice.org applications. | ||
The second toolbar across the top (default location) is the ''Formatting toolbar''. It is a context-sensitive bar which shows the relevant tools in response to the cursor's current position or selection. For example, when the cursor is on a graphic, the Formatting bar provides tools for formatting graphics; when the cursor is in text, the tools are for formatting text. | The second toolbar across the top (default location) is the ''Formatting toolbar''. It is a context-sensitive bar which shows the relevant tools in response to the cursor's current position or selection. For example, when the cursor is on a graphic, the Formatting bar provides tools for formatting graphics; when the cursor is in text, the tools are for formatting text. | ||
| + | |||
| + | [[Image:std-toolbar.png|thumb|none|600px|Standard and Formatting toolbars.]] | ||
==Floating toolbars== | ==Floating toolbars== | ||
| Line 16: | Line 20: | ||
Buttons with a small black triangle will display ''submenus'', ''tear-off toolbars'', and other ways of selecting things with a long click, depending on the button. | Buttons with a small black triangle will display ''submenus'', ''tear-off toolbars'', and other ways of selecting things with a long click, depending on the button. | ||
| − | + | :[[Image:Paste-submenu.png|thumb|none|500px|''Example of a submenu.'']] | |
| − | :[[Image: | + | :[[Image:Tearoff-toolbars.png|thumb|none|500px|''Example of a tear-off toolbar.'']] |
| − | + | ||
| − | + | ||
| − | + | ||
| − | + | ||
The tear-off toolbars can be floating or docked along an edge of the screen or in one of the existing toolbar areas. To move a floating tear-off toolbar, drag it by the title bar. See [[#Moving toolbars|Moving toolbars]]. | The tear-off toolbars can be floating or docked along an edge of the screen or in one of the existing toolbar areas. To move a floating tear-off toolbar, drag it by the title bar. See [[#Moving toolbars|Moving toolbars]]. | ||
| Line 34: | Line 34: | ||
To move a docked toolbar, place the mouse pointer over the toolbar handle, hold down the left mouse button, drag the toolbar to the new location, and then release the mouse button. | To move a docked toolbar, place the mouse pointer over the toolbar handle, hold down the left mouse button, drag the toolbar to the new location, and then release the mouse button. | ||
| − | To move a floating toolbar, click on its title bar and drag it to a new location | + | To move a floating toolbar, click on its title bar and drag it to a new location. |
| − | [[Image: | + | [[Image:Undock-toolbar.png|thumb|none|500px|Moving a docked toolbar.]] |
| + | |||
| + | [[Image:Floating-toolbar.png|thumb|none|500px|Moving a floating toolbar.]] | ||
==Customizing a toolbar== | ==Customizing a toolbar== | ||
| − | + | # Open the Toolbars page of the Customize dialog in one of these ways: | |
| + | #* On the toolbar, click the arrow at the end of the toolbar and choose '''Customize Toolbar'''. | ||
| + | #* Choose '''View > Toolbars > Customize''' from the menu bar. | ||
| + | #* Choose '''Tools > Customize''' from the menu bar. | ||
| + | # On the ''Toolbars'' tab, of the Customize dialog, choose in the Toolbar drop-down list the toolbar you want to customize. | ||
| + | # Click the '''Toolbar''' button on the right to display a drop-down list of choices including '''Icons Only''', '''Text Only''', '''Icons and Text''', and '''Restore Default Settings'''. For toolbars you created, the choices also include '''Rename''' and '''Delete'''. | ||
| + | # To display or hide commands, select or deselect the checkboxes in the ''Toolbar Content – Commands'' section. | ||
| + | # To change the position of commands on a toolbar, select a command and click the big up and down arrows to the right of the lists. | ||
| + | # To add commands to a toolbar, click the Add button on the right. The Add Commands dialog opens. Follow the instructions on this dialog and then click Add to return to the Customize dialog. | ||
| + | # In the '''Save In''' drop-down list, choose whether to save this changed toolbar for the application (for example, Writer) or for a selected document. | ||
| + | # When you have finished, click '''OK''' to save your changes. | ||
| − | + | :[[Image:Customize-toolbars.png|thumb|none|500px|Figure 6. Customizing a toolbar.]] | |
| − | + | ||
| − | + | ||
| − | + | {{Note|There is no in-built tool button editor. To use a custom icon, save it to the <tt>{install path}/</tt><tt>share/config/symbol </tt>directory in *.bmp format. OOo automatically searches this directory for new icons each time the Customize Buttons dialog is opened. Custom icons must be 16 x 16 or 26 x 26 pixels in size and cannot contain more than 256 colors.}} | |
| − | + | ||
| − | + | ||
==Creating a new toolbar== | ==Creating a new toolbar== | ||
| Line 55: | Line 63: | ||
# Choose '''Tools > Customize > Toolbars''' from the menu bar. | # Choose '''Tools > Customize > Toolbars''' from the menu bar. | ||
| − | # Click '''New'''. This will create a toolbar called | + | # Click '''New'''. This will create a toolbar called ''New Toolbar1''. |
# Customize the toolbar as above. | # Customize the toolbar as above. | ||
| − | |||
| − | |||
{{CCBY}} | {{CCBY}} | ||
| − | [[Category: Documentation]] | + | [[Category:Getting Started (Documentation)]] |
Latest revision as of 07:29, 2 July 2018
The top toolbar (default position) is called the Standard toolbar. The Standard toolbar is consistent across the OpenOffice.org applications.
The second toolbar across the top (default location) is the Formatting toolbar. It is a context-sensitive bar which shows the relevant tools in response to the cursor's current position or selection. For example, when the cursor is on a graphic, the Formatting bar provides tools for formatting graphics; when the cursor is in text, the tools are for formatting text.

Floating toolbars
Writer includes several additional context-sensitive toolbars, whose defaults appear as floating toolbars in response to the cursor's current position or selection. For example, when the cursor is in a table, a floating Table toolbar appears, and when the cursor is in a numbered or bullet list, the Bullets and Numbering toolbar appears. You can dock these toolbars to the top, bottom, or side of the window, if you wish (see Moving toolbars).
Long-click buttons and tear-off toolbars
Buttons with a small black triangle will display submenus, tear-off toolbars, and other ways of selecting things with a long click, depending on the button.
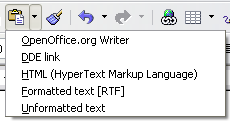 Example of a submenu.

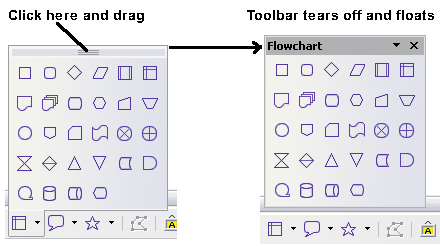 Example of a tear-off toolbar.

The tear-off toolbars can be floating or docked along an edge of the screen or in one of the existing toolbar areas. To move a floating tear-off toolbar, drag it by the title bar. See Moving toolbars.
Displaying or hiding toolbars
To display or hide toolbars, choose View > Toolbars, then click on the name of a toolbar in the list. An active toolbar shows a checkmark beside its name. Tear-off toolbars are not listed in the View menu.
Moving toolbars
To move a docked toolbar, place the mouse pointer over the toolbar handle, hold down the left mouse button, drag the toolbar to the new location, and then release the mouse button.
To move a floating toolbar, click on its title bar and drag it to a new location.


Customizing a toolbar
- Open the Toolbars page of the Customize dialog in one of these ways:
- On the toolbar, click the arrow at the end of the toolbar and choose Customize Toolbar.
- Choose View > Toolbars > Customize from the menu bar.
- Choose Tools > Customize from the menu bar.
- On the Toolbars tab, of the Customize dialog, choose in the Toolbar drop-down list the toolbar you want to customize.
- Click the Toolbar button on the right to display a drop-down list of choices including Icons Only, Text Only, Icons and Text, and Restore Default Settings. For toolbars you created, the choices also include Rename and Delete.
- To display or hide commands, select or deselect the checkboxes in the Toolbar Content – Commands section.
- To change the position of commands on a toolbar, select a command and click the big up and down arrows to the right of the lists.
- To add commands to a toolbar, click the Add button on the right. The Add Commands dialog opens. Follow the instructions on this dialog and then click Add to return to the Customize dialog.
- In the Save In drop-down list, choose whether to save this changed toolbar for the application (for example, Writer) or for a selected document.
- When you have finished, click OK to save your changes.
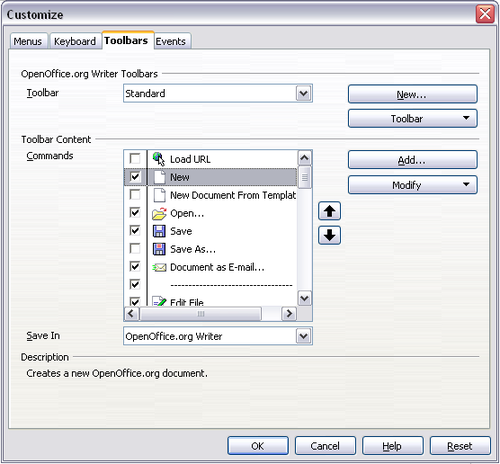 Figure 6. Customizing a toolbar.

| There is no in-built tool button editor. To use a custom icon, save it to the {install path}/share/config/symbol directory in *.bmp format. OOo automatically searches this directory for new icons each time the Customize Buttons dialog is opened. Custom icons must be 16 x 16 or 26 x 26 pixels in size and cannot contain more than 256 colors. |
Creating a new toolbar
To create a new toolbar:
- Choose Tools > Customize > Toolbars from the menu bar.
- Click New. This will create a toolbar called New Toolbar1.
- Customize the toolbar as above.
| Content on this page is licensed under the Creative Common Attribution 3.0 license (CC-BY). |