Difference between revisions of "Documentation/OOoAuthors User Manual/Getting Started/Exporting files"
| Line 104: | Line 104: | ||
[[Image:SetPassword.png|Figure 7]]<br>Figure 7. Setting a password to encrypt a PDF | [[Image:SetPassword.png|Figure 7]]<br>Figure 7. Setting a password to encrypt a PDF | ||
| + | |||
| + | {{CCBY}} | ||
| + | [[Category: Documentation]] | ||
Revision as of 23:50, 18 July 2007
| [[{{{PrevPage}}}|< Previous Page
]] |
[[{{{NextPage}}}|Next Page
>]] |
Contents
Export to XHTML, BibTeX, LaTeX, and Flash
OpenOffice.org can export files to XHTML.
In addition, OOo Writer can export to BibTeX (.bib) and LaTeX 2e (.tex). OOo Draw and OOo Impress can export to Macromedia Flash (.swf).
To export to one of these formats, choose File > Export. On the Export dialog, then select the required format in the File format list.
Export to PDF
OpenOffice.org can directly export to PDF. This industry-standard file format for file viewing is ideal for sending the file to someone else to view using Acrobat Reader or other PDF viewers.
You can export directly to PDF using a button on the toolbar ![]() or by choosing File > Export as PDF.
or by choosing File > Export as PDF.
If you use File > Export as PDF, you are asked to enter the filename for the PDF file, and then the PDF Options dialog (Figure 3) opens.
Note: If you use the Export Directly as PDF button, you are asked to enter the filename for the PDF file, but you cannot choose a page range, the image compression, or other export options.
PDF options
The PDF Options dialog has four pages (General, Initial View, User Interface, Security). Make your selections, and then click Export.
General page of PDF Options dialog
On the General page (Figure 3), you can choose which pages to include in the PDF, the type of compression to use for images (which affects the quality of images in the PDF), and other options.
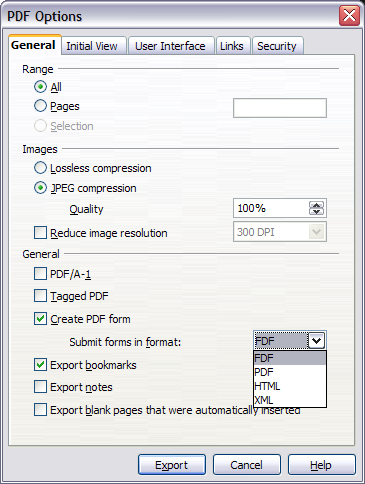
Figure 3. General page of PDF Options dialog
Range section
- All: Exports the entire document.
- Pages: To export a range of pages, use the format 3-6 (pages 3 to 6). To export single pages, use the format 7;9;11 (pages 7, 9, and 11). You can also export a combination of page ranges and single pages, by using a format like 3-6;8;10;12.
- Selection: Exports whatever material is selected.
Images section
- Lossless compression: Images are stored without any loss of quality. Tends to make large files when used with photographs. Recommended for other images.
- JPEG compression: Allows for varying degrees of quality. A setting of 90% tends to work well with photographs (small file size, little perceptible loss).
- Reduce image resolution: Lower-DPI (dots per inch) images have lower quality.
Note: EPS images with embedded previews are exported only as previews. EPS images without embedded previews are exported as empty placeholders.
General section
- Tagged PDF: Includes special tags into the corresponding PDF tags. Some tags that are exported are table of contents, hyperlinks, and controls. This option can increase file sizes significantly.
- Export notes: Exports notes in Writer and Calc documents as PDF notes.You may not want this!
- Export bookmarks: Exports headings as "bookmarks" (a table of contents list displayed by some PDF readers, including Adobe Reader).
- Create PDF form - Submit format: Choose the format of submitting forms from within the PDF file. This setting overrides the control's URL property that you set in the document. There is only one common setting valid for the whole PDF document: PDF (sends the whole document), FDF (sends the control contents), HTML, and XML. Most often you will choose the PDF format.
- Export automatically inserted blank pages: If selected, automatically inserted blank pages are exported to the PDF. This is best if you are printing the PDF double-sided. For example, books usually have chapters set to always start on an odd-numbered (right-hand) page. When the previous chapter ends on an odd page, OOo inserts a blank page between the two odd pages. This option controls whether to export that blank page.
Initial View page of PDF Options dialog
On the Initial View page (Figure 4), you can choose how the PDF opens by default in a PDF viewer. The selections should be self-explanatory.
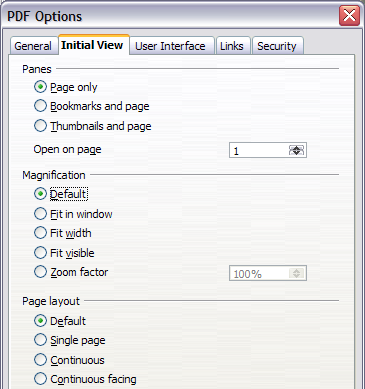
Figure 4. Initial View page of PDF Options dialog
User Interface page of PDF Options dialog
On the User Interface page (Figure 5), you can choose more settings to control how a PDF viewer displays the file. Some of these choices are particularly useful when you are creating a PDF to be used as a presentation or a kiosk-type display.
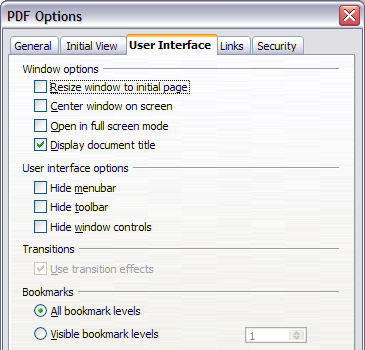
Figure 5. User Interface page of PDF Options dialog
Window options section
- Resize window to initial page. PDF viewer resizes to fit the first page of the PDF.
- Center window on screen. PDF viewer window is centered on the computer screen.
- Open in full screen mode. PDF viewer opens full-screen instead of in a smaller window.
- Display document title. PDF viewer displays the document's title in the title bar.
User interface options section
- Hide menubar. PDF viewer hides the menu bar.
- Hide toolbar. PDF viewer hides the toolbar.
- Hide window controls. PDF viewer hides other window controls.
Transitions section
Includes Impress slide transition effects in the respective PDF effects.
Bookmarks section
Select how many heading levels are displayed as bookmarks, if “Export bookmarks" is selected on the General page.
Security page of PDF Options dialog
As of OOo 2.0.4, PDF export includes options to encrypt the PDF (so it cannot be opened without a password) and apply some digital rights management (DRM) features.
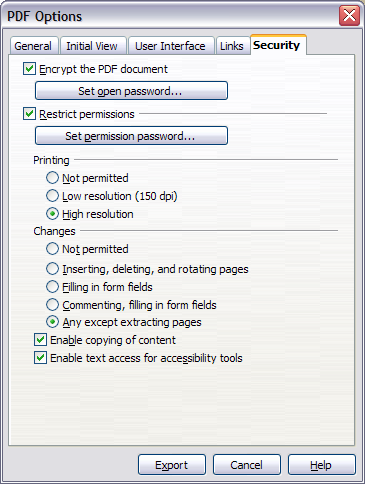
Figure 6. Security page of PDF Options dialog
- With an open password set, the PDF can only be opened with the password. Once opened, there are no restrictions on what the user can do with the document (for example, print, copy, or change it).
- With a permissions password set, the PDF can be opened by anyone, but its permissions can be restricted. See Figure 6.
- With both the open password and permission password set, the PDF can only be opened with the correct password, and its permissions can be restricted.
Note: Permissions settings are effective only if the user's PDF viewer respects the settings.
Figure 7 shows the pop-up dialog displayed when you click the Set open password button on the Security page of the PDF Options dialog box.
After you set a password for permissions, the other choices on the Security page (shown in Figure 6) become available. These selections should be self-explanatory.
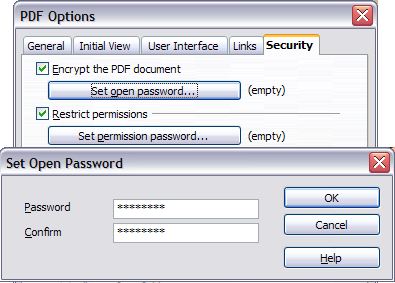
Figure 7. Setting a password to encrypt a PDF
| Content on this page is licensed under the Creative Common Attribution 3.0 license (CC-BY). |