Difference between revisions of "Documentation/OOo3 User Guides/Writer Guide/Numbered bulleted lists"
| (7 intermediate revisions by 4 users not shown) | |||
| Line 2: | Line 2: | ||
{{Documentation/WG3TextTOC | {{Documentation/WG3TextTOC | ||
|ShowPrevNext=block | |ShowPrevNext=block | ||
| − | |PrevPage=Documentation/OOo3_User_Guides/Writer Guide/ | + | |PrevPage=Documentation/OOo3_User_Guides/Writer Guide/AutoFormat |
|NextPage=Documentation/OOo3_User_Guides/Writer Guide/Footnotes and endnotes | |NextPage=Documentation/OOo3_User_Guides/Writer Guide/Footnotes and endnotes | ||
}}__notoc__ | }}__notoc__ | ||
| − | + | There are several ways to create numbered or bulleted lists: | |
| − | * | + | * Use [[Documentation/OOo3_User_Guides/Writer Guide/Autoformat|autoformatting]]. |
| − | * | + | * Use list styles, as described in [[Documentation/OOo3_User_Guides/Writer Guide/Working with Styles|Chapter 7]] (Working with Styles). |
| − | * | + | * Use the '''Numbering''' and '''Bullets''' icons on the paragraph formatting toolbar. This last method is described here. |
| − | + | To produce a numbered or bulleted list, select the paragraphs in the list and then click on the appropriate icon on the toolbar. | |
| − | {{ | + | {{Note|It is a matter of personal preference whether you type your information first, then apply Numbering/Bullets, or apply these as you type.}} |
| − | == | + | == Using the Bullets and Numbering toolbar == |
| − | + | You can create nested lists (where one or more list items has a sublist under it, as in an outline) by using the buttons on the Bullets and Numbering toolbar. You can move items up or down the list, or create subpoints, and even change the style of bullets. Use '''View > Toolbars > Bullets and Numbering''' to see the toolbar. | |
[[Image:Bullets_number_toolbar3.png|thumb|none|500px|''Bullets and Numbering toolbar.'']] | [[Image:Bullets_number_toolbar3.png|thumb|none|500px|''Bullets and Numbering toolbar.'']] | ||
{|cellpadding=2 | {|cellpadding=2 | ||
| − | ||1 | + | ||1 Bullets On/Off||8 Insert Unnumbered Entry |
|- | |- | ||
| − | ||2 | + | ||2 Numbering On/Off||9 Move Up |
|- | |- | ||
| − | ||3 | + | ||3 Numbering Off||10 Move Down |
|- | |- | ||
| − | ||4 | + | ||4 Up One Level||11 Move Up with Subpoints |
|- | |- | ||
| − | ||5 | + | ||5 Down One Level||12 Move Down with Subpoints |
|- | |- | ||
| − | ||6 | + | ||6 Move Up (One Level) with Subpoints||13 Restart Numbering |
|- | |- | ||
| − | ||7 | + | ||7 Move Down (One Level) with Subpoints ||14 Bullets and Numbering |
|- | |- | ||
|} | |} | ||
| − | {{ | + | {{Tip| It is possible to move a list entry up, together with all of its sub-entries. Do this by clicking the '''Promote One Level With Subpoints''' button.}} |
If you create a nested list using the predefined styles, all the levels of the list (up to 10) apply the same numbering (or bullet), however in many circumstances you will want to use a combination of numbering formats and bullets when creating nested lists. Such lists with a mixture of numbering formats and bullets can be easily configured as described in the following example. Additional information on lists and in particular the technique to create your own list style is described in [[Documentation/OOo3_User_Guides/Writer Guide/Working with Styles|Chapter 7]] (Working with Styles). | If you create a nested list using the predefined styles, all the levels of the list (up to 10) apply the same numbering (or bullet), however in many circumstances you will want to use a combination of numbering formats and bullets when creating nested lists. Such lists with a mixture of numbering formats and bullets can be easily configured as described in the following example. Additional information on lists and in particular the technique to create your own list style is described in [[Documentation/OOo3_User_Guides/Writer Guide/Working with Styles|Chapter 7]] (Working with Styles). | ||
| − | {{ | + | {{Tip| When creating nested lists one option is to enter all the list paragraphs first and apply the levels afterwards. |
You can use keyboard shortcuts to move paragraphs up or down the outline levels. Place the cursor at the beginning of the numbered paragraph and press:<br />''Tab'' Down a level<br />''Shift+Tab'' Up a level | You can use keyboard shortcuts to move paragraphs up or down the outline levels. Place the cursor at the beginning of the numbered paragraph and press:<br />''Tab'' Down a level<br />''Shift+Tab'' Up a level | ||
| Line 63: | Line 63: | ||
<ol> | <ol> | ||
| − | <li> | + | <li>Open the ''Styles and Formatting'' window and click the ''List Styles'' icon at the top. Rightclick |
| − | + | on the ''Numbering 1'' style and choose '''Modify''' from the pop-up menu.</li> | |
| − | <li> | + | <li>On the Numbering Style dialog box, go to the '''Outline''' page,where you will find that one style matches our requirements. Click once on that style.</li> |
| + | |||
[[Image:PredefNumStyle.png|thumb|none|500px|''Choosing a predefined outline-numbering style'']] | [[Image:PredefNumStyle.png|thumb|none|500px|''Choosing a predefined outline-numbering style'']] | ||
| − | <li>To modify the layout of the list, use the ''Options'' tab. Notice that the preview on the right shows the outline selected. In the ''Level'' box on the left, select '''1''', then '''2''', '''3''', and '''4''' and see how the information in the ''Numbering'' and ''After'' boxes changes. | + | <li>To modify the layout of the list, use the ''Options'' tab. Notice that the preview on the right shows the outline selected. In the ''Level'' box on the left, select '''1''', then '''2''', '''3''', and '''4''' and see how the information in the ''Numbering'' and ''After'' boxes changes. Use the ''Options'' page to set different punctuation; for example, a period (full stop) after “a” on level 4 instead of a parenthesis.</li> |
[[Image:Level1List.png|thumb|none|500px|''Checking the outline numbering for level-1 list items'']] | [[Image:Level1List.png|thumb|none|500px|''Checking the outline numbering for level-1 list items'']] | ||
| Line 80: | Line 81: | ||
</ol> | </ol> | ||
| − | {{ | + | {{Tip| With outline numbering you can define different bullet styles for the different levels of a bullet list. Use the ''Bullets'' tab of the Bullets and Numbering dialog box (not shown) to select the basic style. Return to the ''Options'' tab to customize the bullet for each indent level. Here you can set bullets to any character. See the ''Graphics'' tab for more bullets.}} |
{{CCBY}} | {{CCBY}} | ||
[[Category:Writer Guide (Documentation)]] | [[Category:Writer Guide (Documentation)]] | ||
Latest revision as of 21:23, 14 July 2018
- Selecting text
- Cutting, copying, and pasting text
- Finding and replacing text and formatting
- Inserting special characters
- Formatting paragraphs
- Formatting characters
- Autoformatting
- Creating numbered or bulleted lists
- Using footnotes and endnotes
- Checking spelling
- Using language tools
- Using the thesaurus
- Hyphenating words
- Using word completion
- Using AutoText
- Line numbering
- Undoing and redoing changes
- Tracking changes to a document
- Inserting notes
- Linking to another part of a document
- Working with hyperlinks
- Tips and tricks
There are several ways to create numbered or bulleted lists:
- Use autoformatting.
- Use list styles, as described in Chapter 7 (Working with Styles).
- Use the Numbering and Bullets icons on the paragraph formatting toolbar. This last method is described here.
To produce a numbered or bulleted list, select the paragraphs in the list and then click on the appropriate icon on the toolbar.
| It is a matter of personal preference whether you type your information first, then apply Numbering/Bullets, or apply these as you type. |
Using the Bullets and Numbering toolbar
You can create nested lists (where one or more list items has a sublist under it, as in an outline) by using the buttons on the Bullets and Numbering toolbar. You can move items up or down the list, or create subpoints, and even change the style of bullets. Use View > Toolbars > Bullets and Numbering to see the toolbar.
| 1 Bullets On/Off | 8 Insert Unnumbered Entry |
| 2 Numbering On/Off | 9 Move Up |
| 3 Numbering Off | 10 Move Down |
| 4 Up One Level | 11 Move Up with Subpoints |
| 5 Down One Level | 12 Move Down with Subpoints |
| 6 Move Up (One Level) with Subpoints | 13 Restart Numbering |
| 7 Move Down (One Level) with Subpoints | 14 Bullets and Numbering |
| It is possible to move a list entry up, together with all of its sub-entries. Do this by clicking the Promote One Level With Subpoints button. |
If you create a nested list using the predefined styles, all the levels of the list (up to 10) apply the same numbering (or bullet), however in many circumstances you will want to use a combination of numbering formats and bullets when creating nested lists. Such lists with a mixture of numbering formats and bullets can be easily configured as described in the following example. Additional information on lists and in particular the technique to create your own list style is described in Chapter 7 (Working with Styles).
Example: configuring a nested list
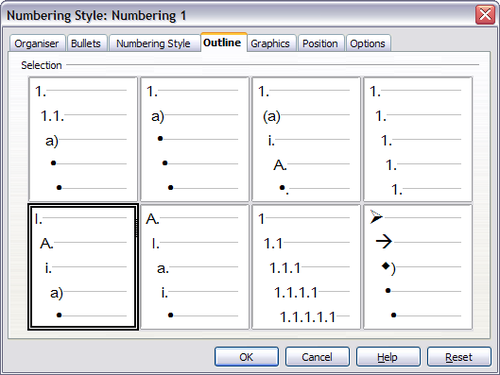
We will use a numbering style to produce the following effect:
  I. Level-1 list item

     A. Level-2 list item

        i. Level-3 list item

           a) Level-4 list item
This example uses one of the supplied styles, Numbering 1, however if you intend to reuse this type of nested list you can also create a new style as illustrated in Chapter 7 (Working with Styles).
- Open the Styles and Formatting window and click the List Styles icon at the top. Rightclick on the Numbering 1 style and choose Modify from the pop-up menu.
- On the Numbering Style dialog box, go to the Outline page,where you will find that one style matches our requirements. Click once on that style.
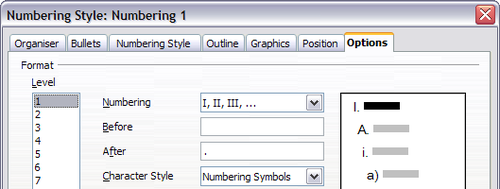
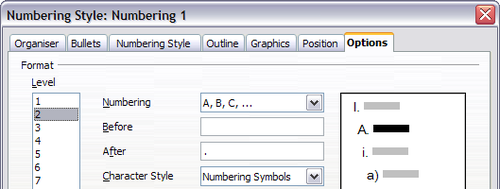
- To modify the layout of the list, use the Options tab. Notice that the preview on the right shows the outline selected. In the Level box on the left, select 1, then 2, 3, and 4 and see how the information in the Numbering and After boxes changes. Use the Options page to set different punctuation; for example, a period (full stop) after “a” on level 4 instead of a parenthesis.
- Repeat for each level as required, then click OK.
To make the indentation at each level greater or less than the default, change it on the Position page. Select the level, then make any changes in the indentation, spacing, or numbering alignment.
| Content on this page is licensed under the Creative Common Attribution 3.0 license (CC-BY). |


