Difference between revisions of "Documentation/OOo3 User Guides/Getting Started/Using the OpenOffice.org Gallery"
m |
|||
| Line 13: | Line 13: | ||
The box on the left of the gallery window lists the available themes. Click on a theme to see its graphics displayed in the Gallery window. | The box on the left of the gallery window lists the available themes. Click on a theme to see its graphics displayed in the Gallery window. | ||
| − | + | You can display the Gallery in ''Icon View'' or ''Detailed View'', and you can hide or show the Gallery by clicking on the ''Hide'' button (similar to the Hide button for the Navigator and the Styles and Formatting window when they are docked). | |
| − | + | ||
| − | You | + | |
[[Image:Gallery1a.png|thumb|none|500px|''Icon view of one theme in the Gallery'']] | [[Image:Gallery1a.png|thumb|none|500px|''Icon view of one theme in the Gallery'']] | ||
| − | + | By default, the Gallery is docked above the workspace. To expand the Gallery, position the pointer over the line that divides it from the top of the workspace. When the pointer changes to parallel lines with arrows, click and drag downward. The workspace resizes in response. | |
| + | |||
| + | As for other docked windows, you can “float” the Gallery by moving the mouse pointer over an edge of the Gallery window, holding down the Control key, and double-clicking. Repeat this procedure to dock the Gallery again. | ||
== Inserting images into a document == | == Inserting images into a document == | ||
| Line 26: | Line 26: | ||
To insert an object: | To insert an object: | ||
| − | # Choose '''Tools > Gallery''' | + | # Choose '''Tools > Gallery''' or click the Gallery icon on the Standard toolbar. |
| − | # Select an object with a single click | + | # Select a theme. |
| + | # Select an object with a single click. | ||
| + | # Drag and drop the image into the document. You also can right-click on the object to open the context menu and select '''Insert > Copy'''. | ||
| − | + | [[Image:InsertFromGallery.png|thumb|none|500px|''Copying a graphic object from the Gallery into a document'']] | |
| − | |||
To insert an object as a link: | To insert an object as a link: | ||
# Choose '''Tools > Gallery''' and select a theme. | # Choose '''Tools > Gallery''' and select a theme. | ||
| − | # Select an object with a single click, then while pressing the ''Shift'' and '' | + | # Select an object with a single click, then while pressing the ''Shift'' and ''Control'' keys, drag and drop the object into the document. |
| − | + | ||
| − | + | ||
== Inserting an object as a background == | == Inserting an object as a background == | ||
| Line 43: | Line 42: | ||
# Choose''' Tools > Gallery''' and select a theme. | # Choose''' Tools > Gallery''' and select a theme. | ||
| − | # Select an object with a single click, right-click on the object and choose '''Insert > Background > Page or Paragraph'''. | + | # Select an object with a single click, right-click on the object, and choose '''Insert > Background > Page or Paragraph'''. |
{{CCBY}} | {{CCBY}} | ||
[[Category:Getting Started (Documentation)]] | [[Category:Getting Started (Documentation)]] | ||
Latest revision as of 09:53, 31 December 2009
The Gallery contains objects (graphics and sounds) that you can insert into your documents. The Gallery is available in all components of OpenOffice.org.
To open the Gallery, choose Tools > Gallery, or click the Gallery icon ![]() . If the Gallery is open, these choices close it.
. If the Gallery is open, these choices close it.
Graphics in the Gallery are grouped by themes, such as Bullets, Rulers, and Backgrounds. You can create other groups or themes.
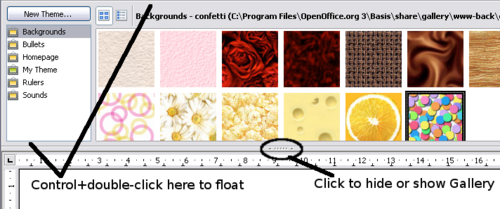
The box on the left of the gallery window lists the available themes. Click on a theme to see its graphics displayed in the Gallery window.
You can display the Gallery in Icon View or Detailed View, and you can hide or show the Gallery by clicking on the Hide button (similar to the Hide button for the Navigator and the Styles and Formatting window when they are docked).
By default, the Gallery is docked above the workspace. To expand the Gallery, position the pointer over the line that divides it from the top of the workspace. When the pointer changes to parallel lines with arrows, click and drag downward. The workspace resizes in response.
As for other docked windows, you can “float” the Gallery by moving the mouse pointer over an edge of the Gallery window, holding down the Control key, and double-clicking. Repeat this procedure to dock the Gallery again.
Inserting images into a document
You can copy or link an object from the Gallery into a document.
To insert an object:
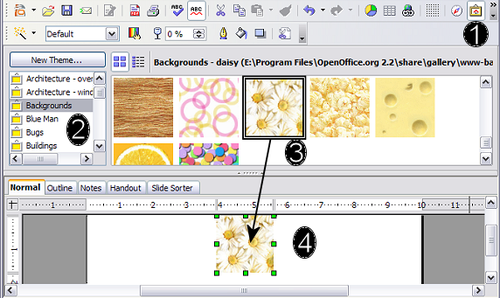
- Choose Tools > Gallery or click the Gallery icon on the Standard toolbar.
- Select a theme.
- Select an object with a single click.
- Drag and drop the image into the document. You also can right-click on the object to open the context menu and select Insert > Copy.
To insert an object as a link:
- Choose Tools > Gallery and select a theme.
- Select an object with a single click, then while pressing the Shift and Control keys, drag and drop the object into the document.
Inserting an object as a background
To insert an object as the background to a page or paragraph:
- Choose Tools > Gallery and select a theme.
- Select an object with a single click, right-click on the object, and choose Insert > Background > Page or Paragraph.
| Content on this page is licensed under the Creative Common Attribution 3.0 license (CC-BY). |

