Difference between revisions of "Documentation/OOo3 User Guides/Getting Started/Graphics, Gallery, Fontwork"
(→Creating a Fontwork object) |
(→Using the Fontwork toolbar) |
||
| Line 200: | Line 200: | ||
: [[Image:FontworkShapes.png|thumb|none|500px|Figure 5: Fontwork toolbar showing palette of shapes.]] | : [[Image:FontworkShapes.png|thumb|none|500px|Figure 5: Fontwork toolbar showing palette of shapes.]] | ||
| − | [[Image: | + | [[Image:FWSameLtrHIcon3.png]] '''Fontwork Same Letter Heights''': Changes the height of characters in the object. Toggles between normal height (some characters taller than others, for example capital letters, d, h, l and others) and all letters the same height. See Figure 6. |
: [[Image:FWSameLtrH.png|thumb|none|500px|Figure 6: Left: normal letters; right: same letter heights.]] | : [[Image:FWSameLtrH.png|thumb|none|500px|Figure 6: Left: normal letters; right: same letter heights.]] | ||
Revision as of 17:58, 12 October 2008
- Chapter 11: Graphics, the Gallery, and Fontwork
This is Chapter 11 of Getting Started with OpenOffice.org 3.x, produced by the OOoAuthors group.
Contents
- 1 Introduction
- 2 Inserting an image from a file
- 3 Inserting images from a graphics program
- 4 Inserting images using a scanner
- 5 Modifying and positioning graphics
- 6 Using the OpenOffice.org Gallery
- 7 Managing the Gallery
- 8 What is Fontwork?
- 9 The Fontwork toolbars
- 10 Creating a Fontwork object
- 11 Editing a Fontwork object
- 12 Moving and resizing Fontwork objects
Introduction
You can add graphic and image files, including photos, drawings, scanned images, and others, to OpenOffice.org documents. OOo can import various vector (line drawing) and raster (bitmap) file formats. The most common are GIF, JPEG or JPG, PNG, and BMP.
Inserting an image from a file
To insert an image from a file, the file must be already stored in a directory (folder) on the computer.
- Determine the destination for the image. Place the cursor at or near the appropriate location in the document.
- On the main menu, select Insert > Picture > From File. This displays the dialog shown below.
- Navigate to the file to be inserted, select it, and click Open.

Linking an image file
If the Link option in the Insert picture dialog is selected, OOo creates a link to the file containing the image, instead of saving a copy of the image in the document. The result is that the image is displayed in the document, but when the document is saved, it contains only a reference to the image file—not the image itself. The document and the image remain as two separate files, and they are merged together only when you open the document again.
Linking an image has two advantages and one disadvantage:
- Advantage – Linking can reduce the size of the document when it is saved, because the image file itself is not included. File size is usually not a problem on a modern computer with a reasonable amount of memory, unless the document includes many large graphics files; OOo can handle quite large files.
- Advantage – You can modify the image file separately without changing the document because the link to the file remains valid, and the modified image will appear when you next open the document. This can be a big advantage if you (or someone else, perhaps a graphic artist) is updating images.
- Disadvantage – If you send the document to someone else, or move it to a different computer, you must also send the image files, or the receiver will not be able to see the linked images. You need to keep track of the location of the images and make sure the recipient knows where to put them on another machine, so the document can find them. For example, you might keep images in a subfolder named Images (under the folder containing the document); the recipient of the file needs to put the images in a subfolder with the same name (under the folder containing the document).
Embedding linked images
If you originally linked the images, you can easily embed one or more of them later if you wish. To do so:
- Open the document in OpenOffice.org and choose Edit > Links.
- The Edit Links dialog shows all the linked files. In the Source file list, select the files you want to change from linked to embedded.
- Click the Break Link button.
- Save the document.

Inserting images from a graphics program
You can use many different graphics programs to edit a graphic file. In these programs, you can select, copy, and paste an image or part of a graphic into an OpenOffice.org document. The figure below shows an example of this procedure.
- In the graphics program window, select an area of the image to be copied.
- Move the cursor over the selected area and press Control+C to copy.
- Switch to the OpenOffice.org window.
- Click to insert the cursor where the graphic is to be inserted.
- Press Control+V to paste.

Inserting images using a scanner
If a scanner is connected to your computer, OOo can call the scanning application and inserted the scanned item into the OOo document page as an image. To start this procedure, select Insert > Picture > Scan > Select Source.
Although this practice is quick and easy, it is unlikely to result in a high-quality image of the correct size. You may get better results by cleaning up scanned material in a graphics program before inserting the resulting image into OOo.
Modifying and positioning graphics
OpenOffice.org provides many tools for resizing, modifying, filtering, and positioning graphics; wrapping text around graphics; and using graphics as backgrounds and watermarks. These tools are described in relevant chapters of the other guides. Some sophisticated adjustments of the graphics are best done in an image manipulation program and the results brought into OOo, rather than using OOo’s inbuilt tools.
Using the OpenOffice.org Gallery
The Gallery contains objects (graphics and sounds) that you can insert into your documents. The Gallery is available in all components of OpenOffice.org.
To open the Gallery, choose Tools > Gallery, or click the Gallery icon ![]() . If the Gallery is open, these choices close it.
. If the Gallery is open, these choices close it.
Graphics in the Gallery are grouped by themes, such as Bullets, Rulers, and Backgrounds. You can create other groups or themes.
The box on the left of the gallery window lists the available themes. Click on a theme to see its graphics displayed in the Gallery window.
The figures below show two views of one of the themes supplied with OpenOffice.org.
You have the option of Icon View or Detailed View for the Gallery, and you can hide or show the Gallery by clicking on the Hide button.


Inserting images into a document
You can copy or link an object from the Gallery into a document.
To insert an object:
- Choose Tools > Gallery and select a theme.
- Select an object with a single click, then drag and drop the image into the document.
You also can right-click on the object to open the context menu and select Insert > Copy.
Inserting objects as links
To insert an object as a link:
- Choose Tools > Gallery and select a theme.
- Select an object with a single click, then while pressing the Shift and Ctrl keys, drag and drop the object into the document.

Inserting an object as a background
To insert an object as the background to a page or paragraph:
- Choose Tools > Gallery and select a theme.
- Select an object with a single click, right-click on the object and choose Insert > Background > Page or Paragraph.
Managing the Gallery
The default themes are locked; no items can be added or deleted from these themes. The locked themes are easily recognizable by right-clicking on them; the only available option in the pop-up menu is Properties.
In a default installation, only the My themes theme is customizable, although new themes can be added as explained in Adding a new theme to the Gallery.
Adding objects to the Gallery
You may wish to add to the Gallery any images that you use frequently, for example, a company logo. You can then very easily insert these graphics into a document later. You can add images only to “My Theme” or to any other theme that you have created; these are indicated by a green icon in the list of themes. You cannot add images to the built-in themes, indicated by an icon of another color.
Method 1 (selecting a file):
- In the theme’s Properties, on the Files page, click the Find Files button. The Select path dialog opens.
- You can enter the path for the file’s directory in the Path text box, or you can navigate to locate the file’s directory. Use the File type drop-down list to help limit the search.
- Click the Select button to start the search.
- A list of graphic files is then displayed in the window. You can use the File type filter again to further limit the search.
- Select the files to add. To select more than one file, hold the Control key down while you click on each file.
- Finally, click Add.
Method 2 (drag and drop):
- Open the document containing an image you want to add to the Gallery, and display the Gallery theme to which you want to add it.
- Position the mouse pointer above the image, without clicking.
- If the mouse pointer changes to a hand symbol, the image refers to a hyperlink. In this case, press the Alt key while you click the image, to select it without activating the link. If the mouse pointer does not change to a hand symbol, you can simply click the image to select it.
- Once the image is selected, evident from the green selection handles around it, release the mouse button. Click again on the image, keeping the mouse button pressed for more than two seconds. Without releasing the mouse button, drag the image into the document.
- Release the mouse button.
Deleting images from the Gallery
To delete an image from a theme:
- Right-click on the name of the image file or its thumbnail in the Gallery.
- Click Delete on the pop-up menu. A message appears, asking if you want to delete this object. Click Yes.
Adding a new theme to the Gallery
To add a new theme to the Gallery:
- Click the New Theme button above the list of themes (see Figure 3).
- In the Properties of New Theme dialog, click the General tab and type a name for the new theme.
- Click the Files tab and add images to the theme, as described earlier.
Deleting a theme from the Gallery
You can delete only theme that you have added to the Gallery; you cannot delete any of the inbuilt themes. To delete a theme from the Gallery:
- Go to Tools > Gallery.
- In the left part of the Gallery, select in the list the theme you wish to delete.
- Right-click on the theme, then click Delete on the pop-up menu.
Location of the Gallery and the objects in it
Graphics and other objects shown in the Gallery can be located anywhere on your computer’s hard disk, on a network drive, or on a CD-ROM. Listings in the Gallery refer to the location of each object. When you add graphics to the Gallery, the files are not moved or copied; only the location of each new object is added as a reference.
In a workgroup situation, you may have access to a shared Gallery (where you cannot change the contents unless authorized to do so) and a user Gallery, where you can add, change, or delete objects.
The location of the user Gallery is specified in Tools > Options > OpenOffice.org > Paths. You can change this location, and you can copy your gallery files (*.sdv) to other computers.
Gallery contents provided with OOo are stored in a location like openoffice\share\gallery. You cannot change this location.
What is Fontwork?
With Fontwork you can create graphical text art objects for making your work more attractive. There are many different settings for text art objects (line, area, position, size, and more), so you have a large choice. You will surely find one that fits your document.
Fontwork is available with each component of OOo, but you will notice small differences in the way that each component displays it.
The Fontwork toolbars
You can use two different toolbars for creating and editing a Fontwork object.
- Go to View > Toolbars > Fontwork.

- If you click on an existing Fontwork object, the Formatting toolbar changes to display the Fontwork options as shown in Using the Formatting toolbar. The contents of this toolbar vary depending on the OOo component with which it is being used.
Creating a Fontwork object
- On the Drawing or Fontwork toolbar, click the Fontwork Gallery icon
 . If the Drawing toolbar is not visible, go to View > Toolbars > Drawing to display it.
 - In the Fontwork Gallery dialog, select a Fontwork style, then click OK. The Fontwork object will appear in your document. Notice the blue squares around the edge (indicating that the object is selected) and the yellow dot; these are discussed in Moving and resizing Fontwork objects.
- Double-click the object to edit the Fontwork text. Type your own text in place of the black Fontwork text that appears over the object.
- Click anywhere in a free space or press Esc to apply your changes.


Editing a Fontwork object
Now that the Fontwork object is created, you can edit some of its attributes. To do this, you can use the Fontwork toolbar, the Formatting toolbar, or menu options as described in this section.
Using the Fontwork toolbar
Make sure that the Fontwork toolbar is visible. If you do not see it, go to View > Toolbars > Fontwork.
Click on the different icons to edit Fontwork objects.
![]() Fontwork Shape: Edits the shape of the selected object. You can choose from a palette of shapes, as shown in Figure 5.
Fontwork Shape: Edits the shape of the selected object. You can choose from a palette of shapes, as shown in Figure 5.
-
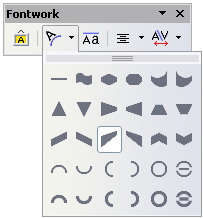 Figure 5: Fontwork toolbar showing palette of shapes.

File:FWSameLtrHIcon3.png Fontwork Same Letter Heights: Changes the height of characters in the object. Toggles between normal height (some characters taller than others, for example capital letters, d, h, l and others) and all letters the same height. See Figure 6.
-
 Figure 6: Left: normal letters; right: same letter heights.

![]() Fontwork Alignment: Changes the alignment of characters. Choices are left align, center, right align, word justify, and stretch justify. The effects of the text alignment can only be seen if the text spans over two or more lines. In the stretch justify mode, all the lines are filled completely.
Fontwork Alignment: Changes the alignment of characters. Choices are left align, center, right align, word justify, and stretch justify. The effects of the text alignment can only be seen if the text spans over two or more lines. In the stretch justify mode, all the lines are filled completely.

![]() Fontwork Character Spacing: Changes the character spacing and kerning in the object. For custom spacing, input a percentage value: 100% is normal spacing; less than 100% is tight spacing; more than 100% is expanded spacing.
Fontwork Character Spacing: Changes the character spacing and kerning in the object. For custom spacing, input a percentage value: 100% is normal spacing; less than 100% is tight spacing; more than 100% is expanded spacing.

Using the Formatting toolbar
Now let us go further and customize the Fontwork object with several more attributes.
Click on the Fontwork object. The Formatting toolbar changes to show all the options for editing the object. (For example, the toolbar shown below appears when you use Fontwork in Writer.)
Note that in this figure the toolbar has been undocked for ease of illustration: unless you have chosen to float the toolbar in this way, it appears in its default, docked position somewhere below the menu bar.
On the Formatting toolbar you have a large choice of options for customizing your object. These choices are the same as the ones for other drawing objects. You can read about them in more detail in the Draw Guide.
Line options
Line icon: Opens a dialog (Error: Reference source not found) with three tabs: Line, Line Styles, Arrow Styles.
- Use the Line tab to edit the most common properties of the line around the selected Fontwork object, by choosing from previously-defined attributes including line style, line color, and arrow styles.
- Use the Lines Styles and Arrow Styles tabs to edit the properties of line and arrow styles, and define new styles.
Arrow Style icon: Choose from the different arrow styles.
Line Style box: Choose from the available line styles.
Line Width box: Set the width of the line.
Line Color box: Select the color of the line.
Area options
Area icon: Opens a dialog (Figure 11) with seven tabs: Area, Shadow, Transparency, Colors, Gradients, Hatching, Bitmaps.
- Area tab: Choose from the predefined list a color, bitmap, gradient or hatching pattern to fill the selected object.
- Shadow tab: Set the shadow properties of the selected object.
- Transparency tab: Set the transparency properties of the selected object.
- Colors tab: Modify the available colors or add new ones to appear on the Area tab.
- Gradients tab: Modify the available gradients or add new ones to appear on the Area tab.
- Hatching tab: Modify the available hatching patterns or add new ones to appear on the Area tab.
- Bitmaps tab: Create simple bitmap patterns and import bitmaps, to make them available on the Area tab.
Area Style / Filling boxes: Select the type of the fill of the selected object. For more detailed settings, use the Area icon.
Positioning options
Rotate icon: Rotate the selected object manually using the mouse to drag the object.
To Foreground icon: Moves the selected object in front of the text.
To Background icon: Moves the selected object behind the text.
Alignment icon: Modifies the alignment of the selected objects.
Bring to front icon: Moves the selected object in front of the others.
Send to back icon: Moves the selected object behind the others.
Change Anchor icon: Switch between anchoring options:
- To Page - The object keeps the same position in relation to the page margins. It does not move as you add or delete text.
- To Paragraph - The object is associated with a paragraph and moves with the paragraph. It may be placed in the margin or another location.
- To Character - The object is associated with a character but is not in the text sequence. It moves with the paragraph but may be placed in the margin or another location. This method is similar to anchoring to a paragraph.
- As Character - The object is placed in the document like any character and moves with the paragraph as you add or delete text before the object.
Ungroup icon: Ungroups the selected objects, so you can manage them individually.
Group icon: Groups the selected objects, so you can manage them as a single object.
You can use some the choices on the Format menu to anchor, align, arrange and group selected Fontwork objects, wrap text around them, and flip them horizontally and vertically.
You can also right-click on a Fontwork object and choose many of the same options from the pop-up menu. In addition, the pop-up menu provides quick access to the Line, Area, Text, and Position and Size dialogs. The Line and Area dialogs are described on pages 16 and 17. The Text dialog offers only a few options for Fontwork objects and is not discussed here.
On the Position and Size dialog, you can enter precise values concerning size and position. For more information, see the Draw Guide.
Moving and resizing Fontwork objects
When you select a Fontwork object, eight blue squares (known as handles) appear around the edge of the object. You can drag these handles to resize the object.
A yellow dot also appears on the object. This dot may be along an edge of the object, or it may be somewhere else; see Figure 13 for an example. If you hover the pointer over this yellow dot, the pointer turns into a hand symbol. You can drag the dot in different directions to distort the object.
Hovering the pointer over other parts of the object turns the pointer into the usual symbol for dragging the object to another part of the page.
For precise control of the location and size of the object, use the Position and Size dialog.
| Content on this page is licensed under the Creative Common Attribution 3.0 license (CC-BY). |