Documentation/How Tos/Using Data Ranges, Data Sort and Data Filters
From Apache OpenOffice Wiki
Using Data Ranges, Data Sort and Data Filters
Defining your Ranges
Working with data ranges enables you to select them very easily, carry out sorting operations, or filter the data using the column and row headers, and thereby avoid risky manual data manipulation.
- Enter your data and organize as you usually do,
- Highlight what you want to become your data range; don't forget to include your column headers,
- click on Data → Define range…
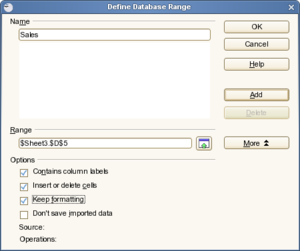
You will see the range that you have selected highlighted in the background. - Give a name to the range designated in the Range field.
If the range isn't what you want, click the icon next to the Range field and select another range. - Click the More button to see additional options:
- Don't forget to check the box Contains column labels, so that your headers are recognized when you carry out sorting
- The Insert or delete cells box allows you to insert or delete data in the range selection
- The Keep formatting box tells Apache OpenOffice to keep the formatting of any new data that you might subsequently enter.
- The Don't save imported data box refers to data that you may have called from a database, so these data will not be saved with your file.
- Click OK to close the dialog box and return to your document.
You can define as many ranges as you want; all you have to do is repeat the procedure explained above, and click the Add button in the dialog box. The same applies if you want to delete a range, select the range you want and click on the corresponding button in the dialog box.
Selecting a Range
Once you have entered your ranges, select the one that you wish to work with as follows:
- Select Data → Select range from the menu.
- Select a data range and click OK .
| Content on this page is licensed under the GNU Free Documentation License (FDL). |

