Définition d'une hiérarchie des titres
- La fenêtre Styles et formatage
- Application de styles de paragraphe
- Application de styles de caractère
- Application de styles de cadre
- Application de styles de page
- Application de styles de liste
- Modification des styles
- Création de styles de paragraphe personnalisés
- Copie et déplacement de styles
- Suppression de styles
- Définition d'une hiérarchie des titres
Outils > Numérotation des chapitres définit la hiérarchie des titres dans un document. Les titres peuvent être numérotés ou non ; typiquement les titres de niveau un dans un document de type livre sont les styles de titre suivant les titres de chapitre, qui peuvent être numérotés, mais les niveaux inférieurs de titre ne sont pas numérotés. Certains styles de numérotation de chapitre et de numéro de titre (tels que ceux utilisés communément dans les rapports)numérotent chaque niveau de chapitre et de titre, par exemple 1, 1.1, 1.2, 2, 2.1 et ainsi de suite. Lorsque les chapitres ou les sections sont ajoutées ou supprimées, la numérotation est automatiquement modifiée.
Les styles de paragraphe sont la clé de la fonction de numérotation du plan de Apache OpenOffice. Les styles de paragraphe par défaut assignés aux niveaux de plan sont les styles de titres fournis avec Apache OpenOffice : Titre1, Titre2 et ainsi de suite. Cependant, vous pouvez substituer tout style souhaité, incluant les styles personnalisés (définis par l'utilisateur).
Lest titres définis en utilisant la fonction de numérotation des chapitre peut être utilisés pour autre chose que la table des matières (décrite dans le Chapitre 12). Par exemple, les champs sont couramment utilisés pour afficher les titres dans les en-têtes et pieds de page (voir le Chapitre 14), et Writer peut envoyer un plan vers Impress pour l'utiliser comme base de la présentation (voir le Guide Impress pour plus de détails).
Choosing paragraph styles for outline levels
If you are using the default heading styles for the headings in your outline, and you do not want to use heading numbering, you do not need to do anything on the Outline Numbering dialog box. The default outline numbering scheme uses the default heading styles (Heading 1, Heading 2, and so on).
To use custom styles in place of one or more of the default heading styles:
- Click Tools > Outline Numbering to open the Outline Numbering dialog box.
- Click the number in the Level box corresponding to the heading for which you want to change the paragraph style.
- In the Numbering: Paragraph Style section, choose from the drop-down list the paragraph style you want to assign to that heading level. For example, when setting up a chapter in the Writer Guide, you would click Level 1 and choose OOoHeading1 (a custom style defined for the OOoAuthors project) to replace Heading 1 and for Level 2, OOoHeading2 to replace Heading 2.
- Repeat for each outline level that you want to change. Click OK when done.
Setting up heading numbering
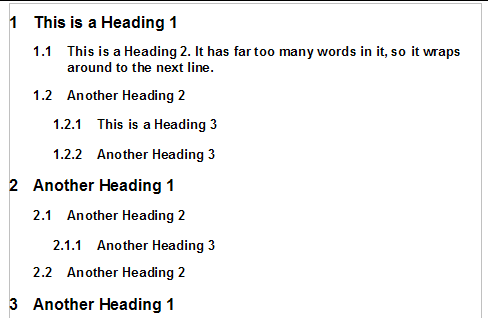
If you want one or more heading levels to be numbered, many choices are available; this example defines a scheme to create headings that look like those below.
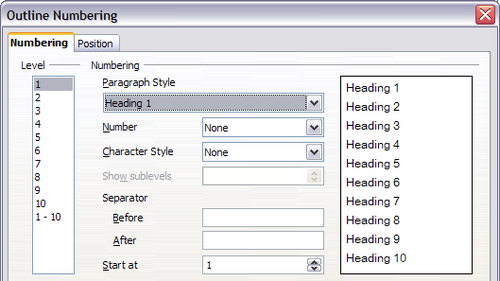
Use the Numbering page of the Outline Numbering dialog box to define the numbering scheme and its appearance. The figure below shows the default settings in the Outline Numbering dialog box.
- In the Level list, choose 1. In the Number list, choose 1, 2, 3, .... The result is shown in the preview box on the right.
- In the Level list, choose 2. In the Number list, choose 1, 2, 3, .... The Show sublevels list is now active; it should show 2 (if not, choose 2). The result is shown below.
- In the Level list, choose 3. In the Number list, choose 1, 2, 3, .... The Show sublevels list should show 3 (if not, choose 3). The result is shown below.
These choices produce the layout shown below.
Setting up the indentation of headings
Whether or not the headings are numbered, you may want to change some of their formatting. For example, you may want the second-level and third-level headings to be indented from the margin. For numbered headings, you may also want the second line of long headings to line up with the first word of the heading, not the number. For these changes, use the Position page of the Outline Numbering dialog box.
Positioning in new OOo3 documents
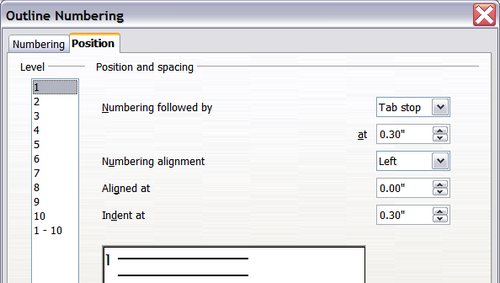
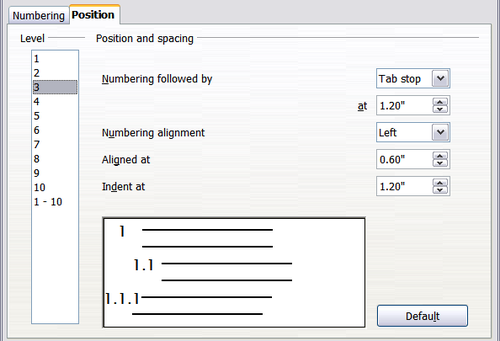
The figure below shows the Position page as it appears for documents created in OOo3.
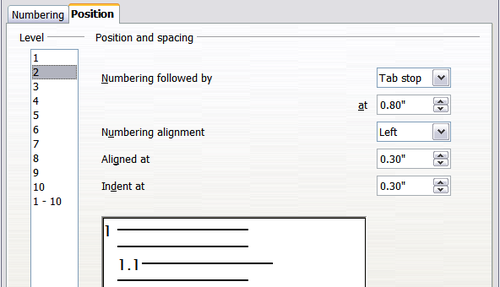
- In the Level list on the left, choose 2. Change the values for Numbering followed by... at and Aligned at, as shown below.
- To change the wrapping behavior of long headings, change Indent at to a larger value, as shown below.
- In the Level list, choose 3. Change the values for Numbering followed by... at, Aligned at, and Indent at, as shown below.
You may want to use a different value. This indents the entire heading but does not affect the way long headings wrap around.
The result is shown below.
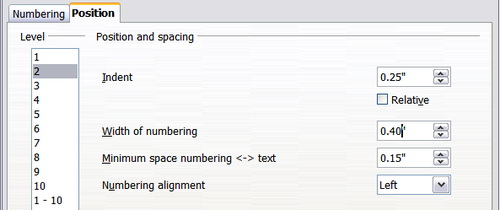
Positioning in older documents opened in OOo3
The four figures below show the Position page as it appears for documents created in earlier versions of OOo and opened in OOo3.
| Content on this page is licensed under the Creative Common Attribution 3.0 license (CC-BY). |

