La fenêtre Styles et formatage
- La fenêtre Styles et formatage
- Application de styles de paragraphe
- Application de styles de caractère
- Application de styles de cadre
- Application de styles de page
- Application de styles de liste
- Modification des styles
- Création de styles de paragraphe personnalisés
- Copie et déplacement de styles
- Suppression de styles
- Définition d'une hiérarchie des titres
Les styles sont mis à disposition à travers un fenêtre flottante ou ancrable appelée Styles et Formatage. Cette fenêtre est centrale dans la gestion des styles. Ne vous inquiétez pas si, au début, le contenu de cette section ou celui du chapitre suivant semble obscure pendant que vous la réalisez. Ce guide décrit comment utiliser toutes ces fonctions.
Pour ouvrir la fenêtre Styles et formatage, faites l'une des actions suivantes :
- Cliquez sur l'icône
 situé à l'extrémité gauche de la barre de formatage.
- Sélectionnez Format > Styles et formatage.
- Appuyer sur F11.
Bases pour la sélection d'un style
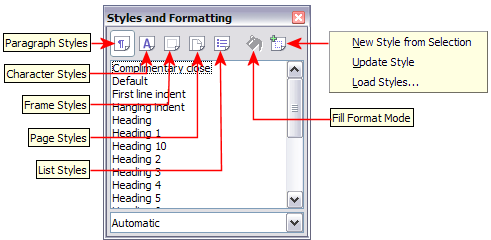
Les cinq premières icônes en haut de la fenêtre Styles et formatage permettent de sélectionner la catégorie de styles sur laquelle on souhaite travailler. Cliquez sur l'une de ces icônes pour afficher la liste de styles appartenant à cette catégorie, telle que styles de paragraphe ou de caractère, dans la fenêtre principale.
Pour appliquer un style caractère à du texte existant, sélectionnez le texte et double cliquez sur le nom du style dans la liste Styles de caractère. Pour appliquer un autre style, mettez le curseur dans le paragraphe, le cadre ou la page que vous souhaitez modifier et double cliquez sur le nom du style dans la section correspondante. Vous pouvez sélectionner plus d'un paragraphe ou plus d'un cadre et leur appliquer le même style en une seule fois.
Utiliser le mode Tout remplir
La sixième icône en haut de la fenêtre Styles et formatage active le mode Tout remplir. Utilisez le mode Tout remplir pour appliquer un style à plusieurs zones différentes rapidement sans avoir à revenir à la fenêtre Styles et formatage et double cliquer à chaque fois. Cette méthode est utile pour formater plusieurs paragraphes, mots ou autres éléments, éparpillés dans le document, avec le même style et peut être plus simple d'utilisation que d'effectuer d'abord une sélection multiple et d'appliquer ensuite le style à chacun d'eux.
- Ouvrez la fenêtre Styles et formatage et sélectionnez un style.
- Cliquez sur l'icône Mode tout remplir
 .
.
- Pour appliquer un style de paragraphe, de page ou de cadre, survolez le paragraphe, la page ou le cadre avec la souris et cliquez. Pour appliquer un style de caractère, maintenez le bouton de la souris pendant la sélection des caractères. Cliquer sur un mot applique le style de caractère à ce mot.
- Répétez l'étape 3 jusqu'à ce que vous ayez fait toutes les modifications au style.
- Pour quitter le Mode tout remplir, cliquez de nouveau sur l'icône ou appuyez sur la touche Échap.
New Style from Selection, Update Style, and Load Styles functions
The last button in the toolbar of the Styles and Formatting window is a multipurpose button that gives access to three different functions: New Style from Selection, Update Style, and Load Styles.
Using New Style from Selection
Use the first function of the multipurpose button to create a new style from the formatting of an object in the current document. For instance, you can change the formatting of a paragraph or frame until it appears as you like, and then you can turn that object’s formatting into a new style. This procedure can save time because you do not have remember all the formatting settings you want, as is necessary when creating a new style with the Style dialog box. Besides, unlike when setting the formatting parameters in dialog box pages as you will learn to do later, you can immediately see how the objects will look like when formatted with the style you are creating.
Follow these steps to create a new style from a selection:
- Change the formatting of the object (paragraph, frame, etc.) to your liking.
- From the icons at the top of the window, choose the type of style to create (paragraph, character, and so on).
- In the document, select the item to save as a style.
- Go back to the Styles and Formatting window and click the New Style from Selection icon.
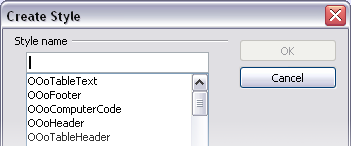
In the Create Style dialog box, enter a name for the new style. The list shows the names of existing custom styles of the selected type, if any. Click OK to save the new style.
Update Style (from a selection)
Let’s use paragraph styles as an example.
- Create a new paragraph (or modify an existing paragraph) and edit all the properties you want to go into the style (such as indentation, font properties, alignment, among others).
- Select the paragraph by clicking anywhere in the paragraph.
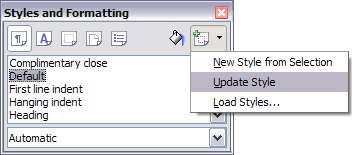
- In the Styles and Formatting window, select the style you want to update (single-click, not double-click) and then click on the New Style from Selection icon and select Update Style.
The procedure to update another type of style (character, page, or frame styles) is the same. Just select the item in question, select the style you want to update, and choose Update Style.
Load Styles (from a template or document)
The last option in the New Style from Selection icon is used to copy styles into the current document by loading them from a template or another document. This method copies all styles, or groups of styles, at one time.
- Open the document to copy styles into.
- In the Styles and Formatting window, click on the New Style from Selection icon and then on Load Styles.
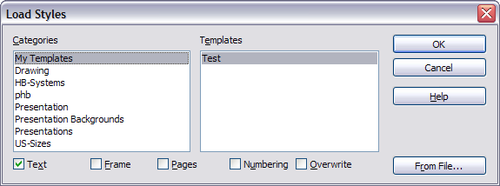
- In the Load Styles dialog box, find and select the template to copy styles from. Click on the From File button if the styles you want are contained in a text document rather than a template. In this case, a standard file selection dialog box opens up, allowing you to select the desired document.
- Select the check boxes for the types of styles to be copied. If you select Overwrite, the styles being copied will replace any styles of the same names in the target document.
- Click OK to copy the styles.
Using the visible styles filters
At the bottom of the Styles and Formatting window, use the drop-down menu to select a filtering criterion for the contents of the main body of the window. Normally, you will find that only a handful of styles are needed in any given document, and it makes sense to have only these styles shown.
So, at the beginning of the writing process, you may want to have access to all the available styles (by selecting All Styles). However, as the document develops, it is useful to reduce the size of the list displayed to only the styles already in use (by selecting Applied Styles). If you work on a document where you want to apply special-purpose styles only (such as those styles used in writing this user guide), select instead Custom Styles. The Hierarchical Styles view is most useful when modifying styles as it reveals which styles are linked together. This topic is discussed in more detail in Chapter 7 (Working with Styles).
If you select the Paragraph Styles view in the Styles and Formatting window, the drop-down menu contains many more filtering options so you can view, for example, only Text Styles, Special Styles, and so on.
Drag-and-drop a selection to create a style
Another little known property of the Styles and Formatting window is the capability of creating a new style with a simple drag-and-drop of a text selection into the Styles and Formatting window.
- Open the Styles and Formatting window.
- Select the style category you are going to create (for example a character style) using one of the five icons in the top left part of the window.
- Select the object you want to base the style on and drag it to the Styles and Formatting window. The cursor changes its shape indicating whether the operation is possible or not.
- In the Create Style dialog box, enter a name for the new style. The list shows the names of existing custom styles of the selected type, if any. Click OK to save the new style.
| Content on this page is licensed under the Creative Common Attribution 3.0 license (CC-BY). |


