Difference between revisions of "Documentation/OOo3 User Guides/Getting Started/Parts of the main window"
(→Floating toolbars) |
(→Moving toolbars) |
||
| (7 intermediate revisions by the same user not shown) | |||
| Line 3: | Line 3: | ||
|ShowPrevNext=block | |ShowPrevNext=block | ||
|PrevPage=Documentation/OOo3_User_Guides/Getting Started/Starting OpenOffice.org | |PrevPage=Documentation/OOo3_User_Guides/Getting Started/Starting OpenOffice.org | ||
| − | |NextPage=Documentation/OOo3_User_Guides/Getting Started/ | + | |NextPage=Documentation/OOo3_User_Guides/Getting Started/Parts of a dialog |
}}__NOTOC__ | }}__NOTOC__ | ||
| − | The main window is similar in each component of OOo, although some details vary. See the | + | The main window is similar in each component of OOo, although some details vary. See the chapters in this book about Writer, Calc, Draw, and Impress for descriptions of those details. |
| − | Common features include the menu bar, standard toolbar, and formatting toolbar at the top of the window and the status bar at the bottom. | + | Common features include the menu bar, the standard toolbar, and the formatting toolbar at the top of the window and the status bar at the bottom. |
== Menu bar == | == Menu bar == | ||
| − | The ''Menu bar'' is located across the top of the | + | The ''Menu bar'' is located across the top of the OOo window, just below the Title bar. When you choose one of the menus listed below, a submenu drops down to show commands. |
* '''File''' contains commands that apply to the entire document such as Open, Save, and Export as PDF. | * '''File''' contains commands that apply to the entire document such as Open, Save, and Export as PDF. | ||
| − | * '''Edit''' contains commands for editing the document such as Undo and Find & Replace. It also contains commands to cut, copy, and paste selected parts of | + | * '''Edit''' contains commands for editing the document such as Undo, AutoText, and Find & Replace. It also contains commands to cut, copy, and paste selected parts of the document. |
| − | * '''View''' contains commands for controlling the display of the document such as | + | * '''View''' contains commands for controlling the display of the document such as Toolbars, Data Sources, and Zoom. |
* '''Insert''' contains commands for inserting elements into your document such as Header, Footer, and Picture. | * '''Insert''' contains commands for inserting elements into your document such as Header, Footer, and Picture. | ||
| − | * '''Format''' contains commands | + | * '''Format''' contains commands such as Styles and Formatting and AutoCorrect for formatting the layout of your document. |
* '''Table''' shows all commands to insert and edit a table in a text document. | * '''Table''' shows all commands to insert and edit a table in a text document. | ||
| − | * '''Tools''' contains functions such as Spelling and Grammar, Customize, and Options. | + | * '''Tools''' contains functions such as Spelling and Grammar, Customize, Gallery, and Options. |
* '''Window''' contains commands for the display window. | * '''Window''' contains commands for the display window. | ||
* '''Help''' contains links to the OpenOffice.org Help file, What’s This?, and information about the program. See [[../How to get Help|How to get help]]. | * '''Help''' contains links to the OpenOffice.org Help file, What’s This?, and information about the program. See [[../How to get Help|How to get help]]. | ||
| Line 25: | Line 25: | ||
OOo has several types of toolbars: docked, floating, and tear-off. Docked toolbars can be moved to different locations or made to float, and floating toolbars can be docked. | OOo has several types of toolbars: docked, floating, and tear-off. Docked toolbars can be moved to different locations or made to float, and floating toolbars can be docked. | ||
| − | The top toolbar (default position) is called the ''Standard toolbar''. | + | The top docked toolbar (default position) is called the ''Standard toolbar''. It is consistent across the OpenOffice.org applications. |
The second toolbar across the top (default location) is the ''Formatting toolbar''. It is a context-sensitive bar that shows the relevant tools in response to the cursor’s current position or selection. For example, when the cursor is on a graphic, the Formatting bar provides tools for formatting graphics; when the cursor is in text, the tools are for formatting text. | The second toolbar across the top (default location) is the ''Formatting toolbar''. It is a context-sensitive bar that shows the relevant tools in response to the cursor’s current position or selection. For example, when the cursor is on a graphic, the Formatting bar provides tools for formatting graphics; when the cursor is in text, the tools are for formatting text. | ||
| Line 35: | Line 35: | ||
Toolbar icons with a small black triangle will display ''submenus'', ''tear-off toolbars'', and other ways of selecting things, depending on the icon. | Toolbar icons with a small black triangle will display ''submenus'', ''tear-off toolbars'', and other ways of selecting things, depending on the icon. | ||
| − | The tear-off toolbars can be floating or docked along an edge of the | + | The tear-off toolbars can be floating or docked along an edge of the OOo window or in one of the existing toolbar areas. To move a floating tear-off toolbar, drag it by the title bar. See [[#Moving toolbars|Moving toolbars]]. |
| − | :[[Image:Tearoff-toolbars.png|thumb|none|500px|''Example of a tear-off toolbar | + | :[[Image:Tearoff-toolbars.png|thumb|none|500px|''Example of a tear-off toolbar'']] |
== Moving toolbars == | == Moving toolbars == | ||
| Line 44: | Line 44: | ||
To move a floating toolbar, click on its title bar and drag it to a new location. | To move a floating toolbar, click on its title bar and drag it to a new location. | ||
| − | [[Image:Undock- | + | [[Image:Undock-toolbar3.png|thumb|none|500px|''Moving a docked toolbar'']] |
| − | [[Image:Floating- | + | [[Image:Floating-toolbar3.png|thumb|none|500px|''Moving a floating toolbar'']] |
== Floating toolbars == | == Floating toolbars == | ||
| Line 58: | Line 58: | ||
* Click on the title bar of the floating window and drag it to the side until you see the outline of a box appear in the main window, then release the window. This method depends on your system’s window manager settings, so it may not work for you. | * Click on the title bar of the floating window and drag it to the side until you see the outline of a box appear in the main window, then release the window. This method depends on your system’s window manager settings, so it may not work for you. | ||
| − | :[[Image:Docking.png|thumb|none|500px|Docking a window | + | :[[Image:Docking.png|thumb|none|500px|''Docking a window'']] |
| − | * Hold down the ''Control'' key and double-click on | + | * Hold down the ''Control'' key and double-click on the frame of the floating window (or in a vacant area near the icons at the top) to dock it in its last position. If that does not work, try double-clicking without using the ''Control'' key. |
| − | To undock a window, hold down the ''Control'' key and double-click on a vacant | + | To undock a window, hold down the ''Control'' key and double-click on frame (or a vacant are near the icons at the top) of the docked window. |
| − | + | ||
| − | + | ||
==Customizing toolbars== | ==Customizing toolbars== | ||
| − | You can customize toolbars in several ways, including choosing which icons are visible and locking the position of a docked toolbar. You can also add icons and create new toolbars, as described in Chapter 14. | + | You can customize toolbars in several ways, including choosing which icons are visible and locking the position of a docked toolbar. You can also add icons and create new toolbars, as described in [[../Customizing OpenOffice.org|Chapter 14]]. |
| + | |||
To access a toolbar’s customization options, use the down-arrow at the end of the toolbar or on its title bar. | To access a toolbar’s customization options, use the down-arrow at the end of the toolbar or on its title bar. | ||
| − | [[Image:Custom-toolbars.png|thumb|none|500px|Customizing toolbars | + | [[Image:Custom-toolbars.png|thumb|none|500px|''Customizing toolbars'']] |
To show or hide icons defined for the selected toolbar, choose Visible Buttons from the drop-down menu. Visible icons have a checkmark next to them. Click on icons to select or deselect them. | To show or hide icons defined for the selected toolbar, choose Visible Buttons from the drop-down menu. Visible icons have a checkmark next to them. Click on icons to select or deselect them. | ||
| Line 76: | Line 75: | ||
== Right-click (context) menus == | == Right-click (context) menus == | ||
You can quickly access many menu functions by right-clicking on a paragraph, graphics, or other object. A context menu will pop up. Often the context menu is the fastest and easier way to reach a function. If you’re not sure where in the menus or toolbars a function is located, you can often find it by right-clicking. | You can quickly access many menu functions by right-clicking on a paragraph, graphics, or other object. A context menu will pop up. Often the context menu is the fastest and easier way to reach a function. If you’re not sure where in the menus or toolbars a function is located, you can often find it by right-clicking. | ||
| + | |||
| + | ==Status bar== | ||
| + | The status bar is located at the bottom of the workspace. It provides information about the document and convenient ways to quickly change some features. It is similar in Writer, Calc, Impress, and Draw, although each component includes some component-specific items. | ||
| + | |||
| + | [[Image:WriterStatusBar1.png|thumb|none|500px|Left end of status bar in Writer]] | ||
| + | |||
| + | [[Image:WriterStatusBar2.png|thumb|none|500px|Right end of status bar in Writer]] | ||
| + | |||
| + | Common status bar items are described below. | ||
| + | |||
| + | ===Page, sheet, or slide number=== | ||
| + | Shows the current page, sheet, or slide number and the total number of pages, sheets, or slides in the document. Double-click on this field to open the Navigator. Other uses of this field depend on the component. | ||
| + | ===Page style or slide design=== | ||
| + | Shows the current page style or slide design. To edit the current page style or slide design, double-click on this field. | ||
| + | ===Unsaved changes=== | ||
| + | An asterisk (*) appears here if changes to the document have not been saved. | ||
| + | ===Digital signature=== | ||
| + | If the document has been digitally signed, an icon [[Image:SecurePDFicon.png]] shows here. You can double-click the icon to view the certificate. | ||
| + | |||
| + | ===Object information=== | ||
| + | Displays information relevant to the cursor’s position or the selected element of the document. Double-clicking in this area usually opens a relevant dialog. | ||
| + | ===Zoom slider and percent=== | ||
| + | To change the view magnification, drag the Zoom slider, or click on the + and – signs, or right-click on the zoom level percent to pop up a list of magnification values from which to choose. Double-clicking on the zoom level percent opens the Zoom & View Layout dialog. | ||
{{CCBY}} | {{CCBY}} | ||
[[Category:Getting Started (Documentation)]] | [[Category:Getting Started (Documentation)]] | ||
Latest revision as of 00:22, 10 April 2010
- The advantages of OpenOffice.org
- Minimum requirements
- How to get and install the software
- How to get help
- Starting OpenOffice.org
- Parts of the main window
- Parts of a dialog (box)
- Starting a new document
- Opening an existing document
- Saving, renaming, and deleting documents
- Using the Open and Save As dialogs
- Using the Navigator
- Undoing and redoing changes
- Closing a document
The main window is similar in each component of OOo, although some details vary. See the chapters in this book about Writer, Calc, Draw, and Impress for descriptions of those details.
Common features include the menu bar, the standard toolbar, and the formatting toolbar at the top of the window and the status bar at the bottom.
Menu bar
The Menu bar is located across the top of the OOo window, just below the Title bar. When you choose one of the menus listed below, a submenu drops down to show commands.
- File contains commands that apply to the entire document such as Open, Save, and Export as PDF.
- Edit contains commands for editing the document such as Undo, AutoText, and Find & Replace. It also contains commands to cut, copy, and paste selected parts of the document.
- View contains commands for controlling the display of the document such as Toolbars, Data Sources, and Zoom.
- Insert contains commands for inserting elements into your document such as Header, Footer, and Picture.
- Format contains commands such as Styles and Formatting and AutoCorrect for formatting the layout of your document.
- Table shows all commands to insert and edit a table in a text document.
- Tools contains functions such as Spelling and Grammar, Customize, Gallery, and Options.
- Window contains commands for the display window.
- Help contains links to the OpenOffice.org Help file, What’s This?, and information about the program. See How to get help.
Toolbars
OOo has several types of toolbars: docked, floating, and tear-off. Docked toolbars can be moved to different locations or made to float, and floating toolbars can be docked.
The top docked toolbar (default position) is called the Standard toolbar. It is consistent across the OpenOffice.org applications.
The second toolbar across the top (default location) is the Formatting toolbar. It is a context-sensitive bar that shows the relevant tools in response to the cursor’s current position or selection. For example, when the cursor is on a graphic, the Formatting bar provides tools for formatting graphics; when the cursor is in text, the tools are for formatting text.
Displaying or hiding toolbars
To display or hide toolbars, choose View > Toolbars, then click on the name of a toolbar in the list. An active toolbar shows a checkmark beside its name. Tear-off toolbars are not listed in the View menu.
Toolbar icons with a small black triangle will display submenus, tear-off toolbars, and other ways of selecting things, depending on the icon.
The tear-off toolbars can be floating or docked along an edge of the OOo window or in one of the existing toolbar areas. To move a floating tear-off toolbar, drag it by the title bar. See Moving toolbars.
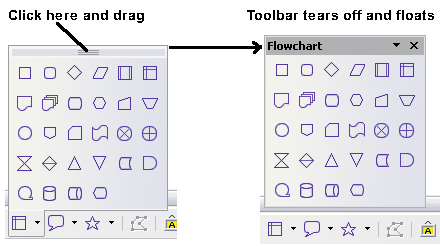 Example of a tear-off toolbar

Moving toolbars
To move a docked toolbar, place the mouse pointer over the toolbar handle, hold down the left mouse button, drag the toolbar to the new location, and then release the mouse button.
To move a floating toolbar, click on its title bar and drag it to a new location.


Floating toolbars
Apache OpenOffice includes several additional context-sensitive toolbars, whose defaults appear as floating toolbars in response to the cursor’s current position or selection. For example, when the cursor is in a table, a floating Table toolbar appears, and when the cursor is in a numbered or bullet list, the Bullets and Numbering toolbar appears. You can dock these toolbars to the top, bottom, or side of the window, if you wish (see Moving toolbars).
Docking/floating windows and toolbars
Toolbars and some windows, such as the Navigator and the Styles and Formatting window, are dockable. You can move, re-size or dock them to an edge.
To dock a window or toolbar, do one of the following:
- Click on the title bar of the floating window and drag it to the side until you see the outline of a box appear in the main window, then release the window. This method depends on your system’s window manager settings, so it may not work for you.
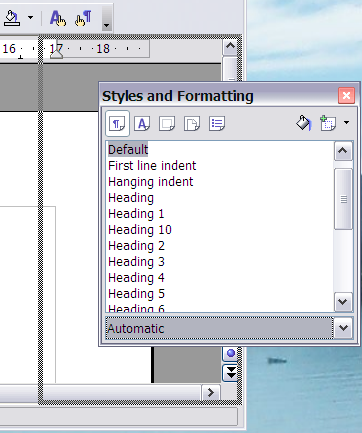 Docking a window

- Hold down the Control key and double-click on the frame of the floating window (or in a vacant area near the icons at the top) to dock it in its last position. If that does not work, try double-clicking without using the Control key.
To undock a window, hold down the Control key and double-click on frame (or a vacant are near the icons at the top) of the docked window.
Customizing toolbars
You can customize toolbars in several ways, including choosing which icons are visible and locking the position of a docked toolbar. You can also add icons and create new toolbars, as described in Chapter 14.
To access a toolbar’s customization options, use the down-arrow at the end of the toolbar or on its title bar.

To show or hide icons defined for the selected toolbar, choose Visible Buttons from the drop-down menu. Visible icons have a checkmark next to them. Click on icons to select or deselect them.
You can quickly access many menu functions by right-clicking on a paragraph, graphics, or other object. A context menu will pop up. Often the context menu is the fastest and easier way to reach a function. If you’re not sure where in the menus or toolbars a function is located, you can often find it by right-clicking.
Status bar
The status bar is located at the bottom of the workspace. It provides information about the document and convenient ways to quickly change some features. It is similar in Writer, Calc, Impress, and Draw, although each component includes some component-specific items.


Common status bar items are described below.
Page, sheet, or slide number
Shows the current page, sheet, or slide number and the total number of pages, sheets, or slides in the document. Double-click on this field to open the Navigator. Other uses of this field depend on the component.
Page style or slide design
Shows the current page style or slide design. To edit the current page style or slide design, double-click on this field.
Unsaved changes
An asterisk (*) appears here if changes to the document have not been saved.
Digital signature
If the document has been digitally signed, an icon ![]() shows here. You can double-click the icon to view the certificate.
shows here. You can double-click the icon to view the certificate.
Object information
Displays information relevant to the cursor’s position or the selected element of the document. Double-clicking in this area usually opens a relevant dialog.
Zoom slider and percent
To change the view magnification, drag the Zoom slider, or click on the + and – signs, or right-click on the zoom level percent to pop up a list of magnification values from which to choose. Double-clicking on the zoom level percent opens the Zoom & View Layout dialog.
| Content on this page is licensed under the Creative Common Attribution 3.0 license (CC-BY). |